

Notice
Recent Posts
Recent Comments
Link
| 일 | 월 | 화 | 수 | 목 | 금 | 토 |
|---|---|---|---|---|---|---|
| 1 | 2 | 3 | 4 | 5 | ||
| 6 | 7 | 8 | 9 | 10 | 11 | 12 |
| 13 | 14 | 15 | 16 | 17 | 18 | 19 |
| 20 | 21 | 22 | 23 | 24 | 25 | 26 |
| 27 | 28 | 29 | 30 |
Tags
- EC2 인스턴스
- load balancer
- GNS3
- ALB
- aws cloud school
- docker
- EC2
- Kubernetes
- linux
- Ebs
- Troubleshooting
- aws cloud
- aws iam
- aws saa
- NAT
- IAM
- FTP
- AWS 자격증
- ELB
- aws SAA-c03
- vmware
- vyos
- tftp
- KUBECTL
- aws cloud shcool 8
- Firewall
- 네트워크
- AWS
- DNS
- SAA-C03
Archives
- Today
- Total
나의 공부기록
[AWS] 03-2. AWS ELB 실습(ALB & AMI) 본문
문제
ALB를 만들어보세요.
해당 ALB의 DNS 이름:80으로 접속했을 때, 하나의 AMI를 베이스로 만들어진 두 인스턴스 각각의 HOST IP가 출력되도록 해보세요. tomcat으로 하시면 됩니다. 타겟그룹의 HOST들은 AMI로 생성된 인스턴스여야 합니다. ALB는 한 개를 만드시고, HOST의 IP는 최소 두 개가 출력되게 해 보세요.(= 서버 2개 이상 만들기) tomcat을 wget으로 받으셔서 하세요. 보여질 페이지를 수정하진 마세요.
AMI 이미지 생성 ➡️ 2개 이상의 인스턴스 생성
제공되는 페이지에 IP 출력
jsp 파일을 통해 자동으로 IP 출력? : 수동X / 자동으로
풀이
더보기


1. AMI 서버 생성 - tomcat

2. tomcat 설치
2-1. apt 업데이트
ubuntu@ip-10-10-1-189:~$ sudo -i
root@ip-10-10-1-189:~# apt update -y
2-2. openjdk-11-jdk & wget & unzip 설치 - Ubuntu
root@ip-10-10-1-189:~# apt install -y openjdk-11-jdk wget unzip
2-3. tomcat 다운로드
root@ip-10-10-1-189:~# wget https://dlcdn.apache.org/tomcat/tomcat-10/v10.1.36/bin/apache-tomcat-10.1.36.zip
2-4. 압축 해제 & 폴더명 변경
# tomcat 폴더 압축해제
root@ip-10-10-1-189:~# unzip apache-tomcat-10.1.36.zip

root@ip-10-10-1-189:~# ls
apache-tomcat-10.1.36  apache-tomcat-10.1.36.zip  snap

# 폴더명 tomcat으로 변경
root@ip-10-10-1-189:~# mv apache-tomcat-10.1.36/ tomcat

# zip파일 삭제
root@ip-10-10-1-189:~# rm -rf apache-tomcat-10.1.36.zip

root@ip-10-10-1-189:~# ls
snap  tomcat
2-5. tomcat 폴더 권한 부여
root@ip-10-10-1-189:~# chmod 777 -R tomcat
2-6. tomcat 데몬으로 등록
- systemctl에 tomcat 등록
root@ip-10-10-1-189:~# tee /etc/systemd/system/tomcat.service <<EOF
[Unit]
Description=tomcat10
After=network.target syslog.target

[Service]
Type=forking
Environment="/root/tomcat"
User=root
Group=root
ExecStart=/root/tomcat/bin/startup.sh
ExecStop=/root/tomcat/bin/shutdown.sh

[Install]
WantedBy=multi-user.target
EOF
[Unit]
Description=tomcat10
After=network.target syslog.target

[Service]
Type=forking
Environment="/root/tomcat"
User=root
Group=root
ExecStart=/root/tomcat/bin/startup.sh
ExecStop=/root/tomcat/bin/shutdown.sh

[Install]
WantedBy=multi-user.target- tomcat 추가 반영 & 재시작
root@ip-10-10-1-189:~# systemctl daemon-reload
root@ip-10-10-1-189:~# systemctl restart tomcat- 서버 재부팅해도 tomcat 실행
root@ip-10-10-1-189:~# systemctl enable tomcat
Created symlink /etc/systemd/system/multi-user.target.wants/tomcat.service → /etc/systemd/system/tomcat.service.
➕ systemctl로 tomcat을 컨트롤 하는 방법
- tee 명령 = cat
- 차이점은 내용을 한 번 더 출력하는 것
[ 원본 서식 ]
tee /etc/systemd/system/tomcat.service <<EOF
[Unit]
Description=tomcat10
After=network.target syslog.target

[Service]
Type=forking
Environment="/root/tomcat"
User=root
Group=root
ExecStart=/root/tomcat/bin/startup.sh
ExecStop=/root/tomcat/bin/shutdown.sh

[Install]
WantedBy=multi-user.target
EOF
3. HOST IP 출력 파일 생성
root@ip-10-10-1-189:~# cd tomcat
root@ip-10-10-1-189:~/tomcat# cd webapps/ROOT
root@ip-10-10-1-189:~/tomcat/webapps/ROOT# ls
RELEASE-NOTES.txt asf-logo-wide.svg bg-middle.png bg-upper.png index.jsp tomcat.svg
WEB-INF bg-button.png bg-nav.png favicon.ico tomcat.css
root@ip-10-10-1-189:~/tomcat/webapps/ROOT# vi test.jsp
[추가 내용]
<%@ page language="java" contentType="text/html; charset=UTF-8" pageEncoding="UTF-8" %>
<%@ page import="java.net.InetAddress" %>
<!DOCTYPE html>
<html>
<head>
<meta charset="UTF-8">
<title>Server IP Address</title>
</head>
<body>
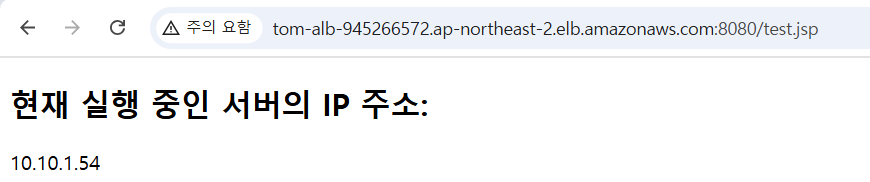
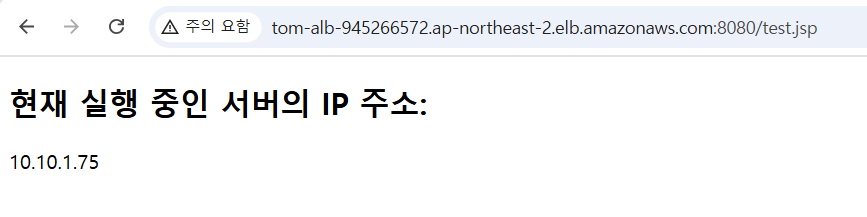
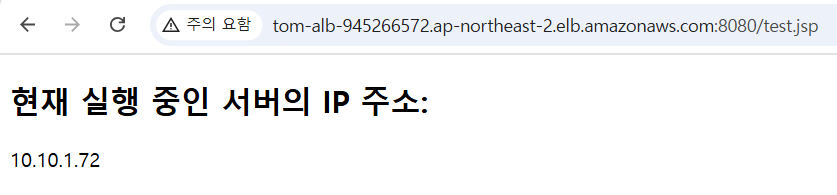
<h2>현재 실행 중인 서버의 IP 주소:</h2>
<p>
<%
try {
String serverIp = InetAddress.getLocalHost().getHostAddress();
out.println(serverIp);
} catch (Exception e) {
out.println("IP 주소를 가져오는 중 오류 발생: " + e.getMessage());
}
%>
</p>
</body>
</html>
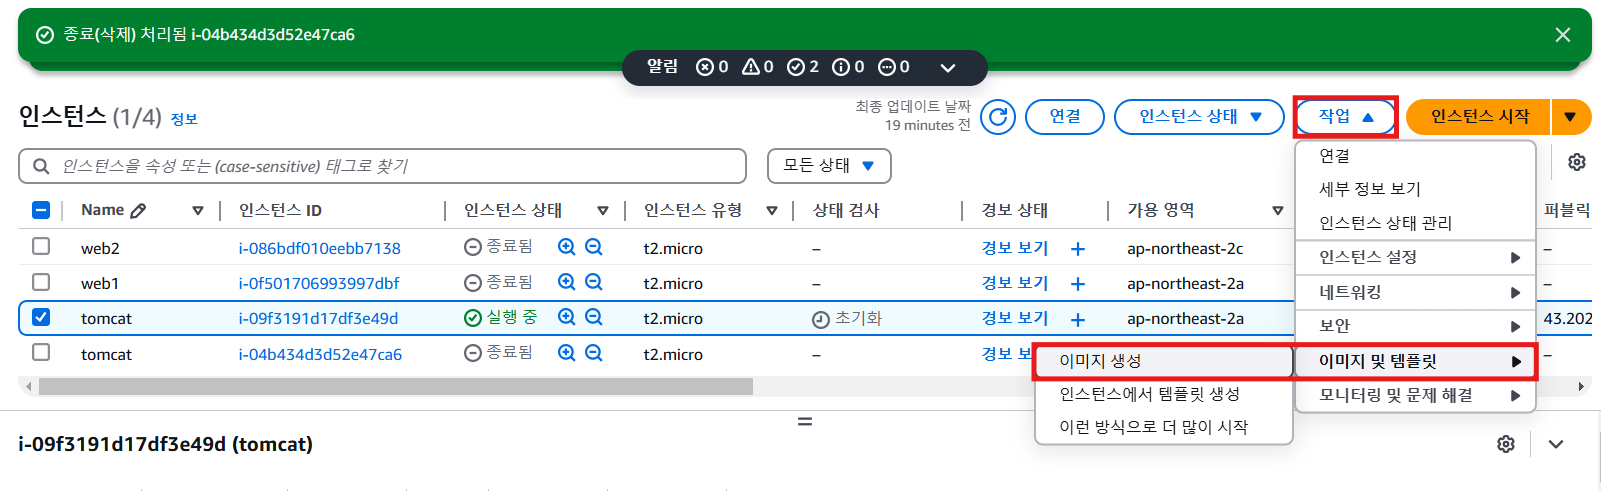
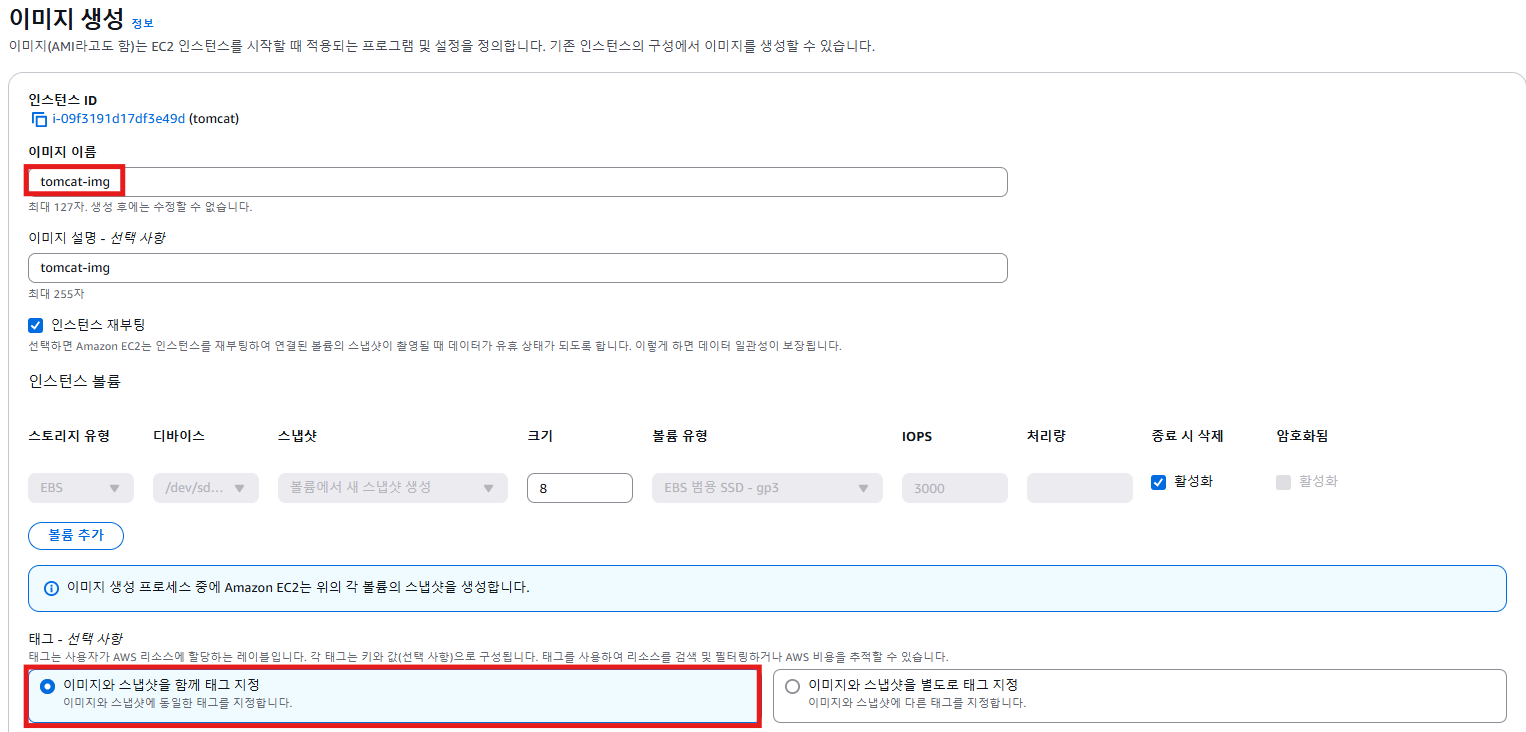
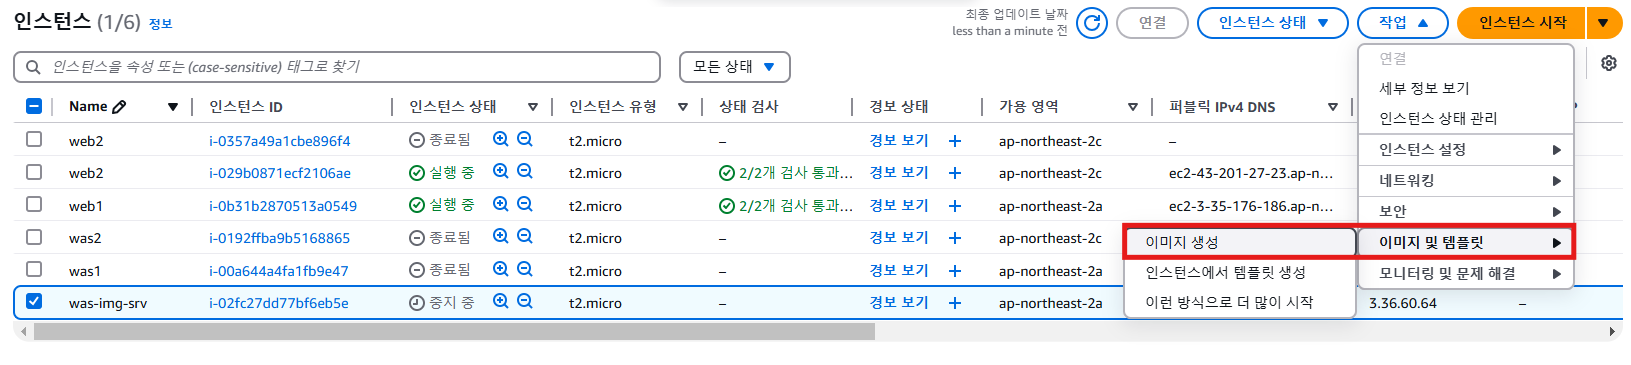
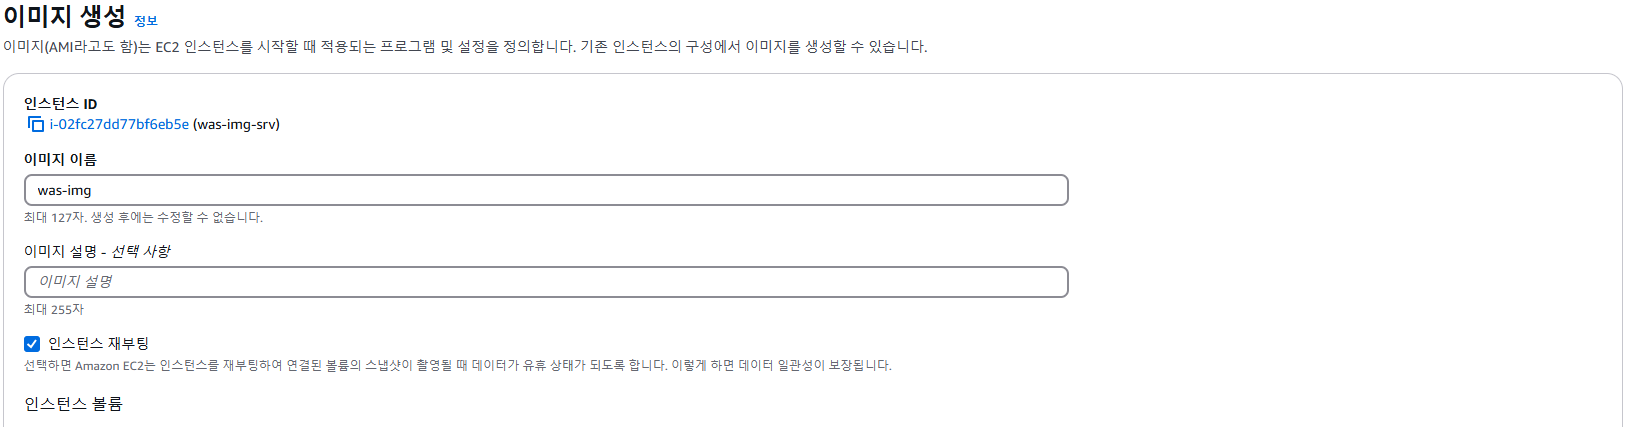
4. Custom AMI 생성
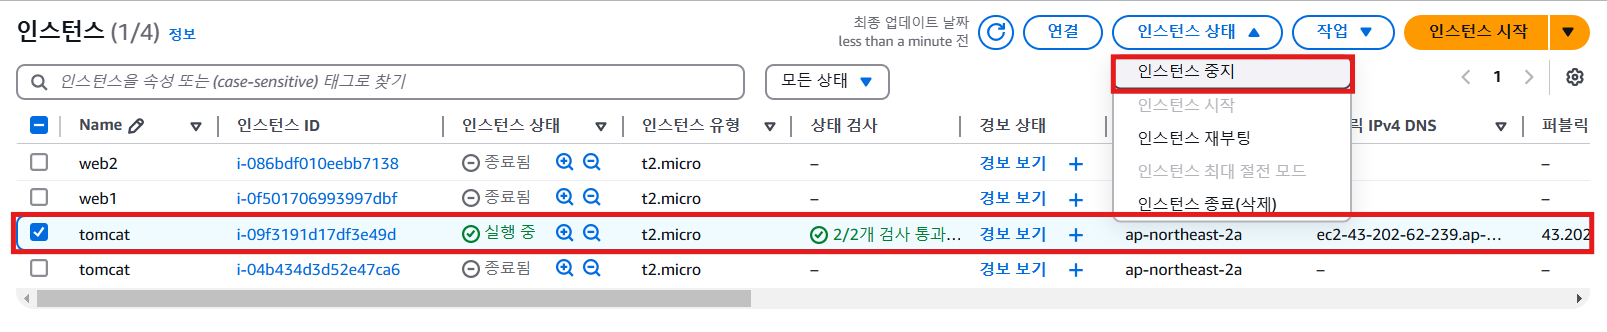
- tomcat 중지
- AMI 이미지 생성
- AMI 생성 확인
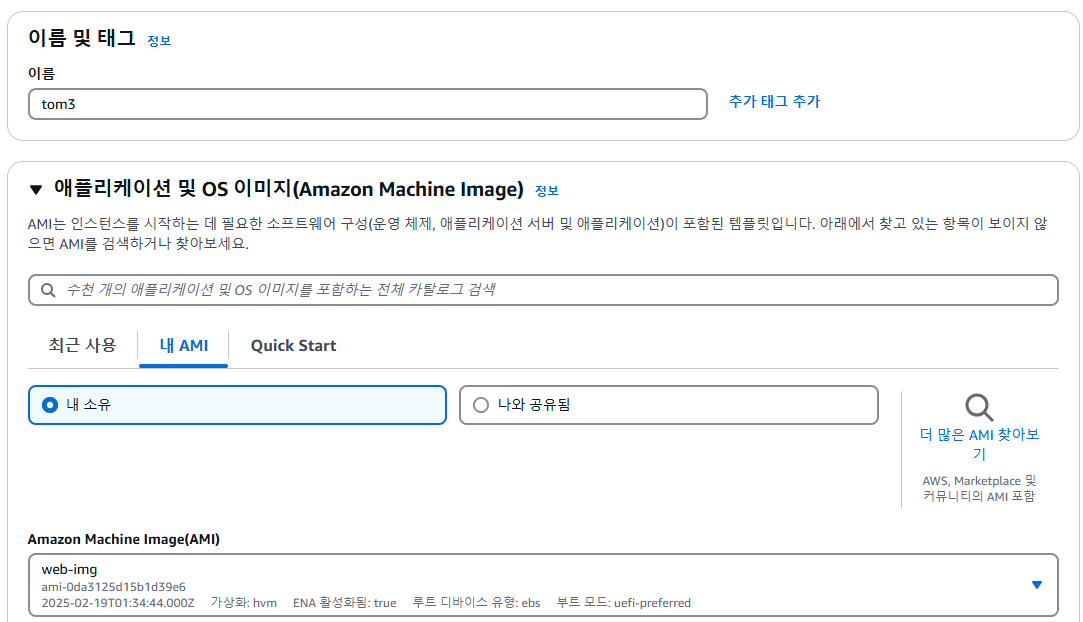
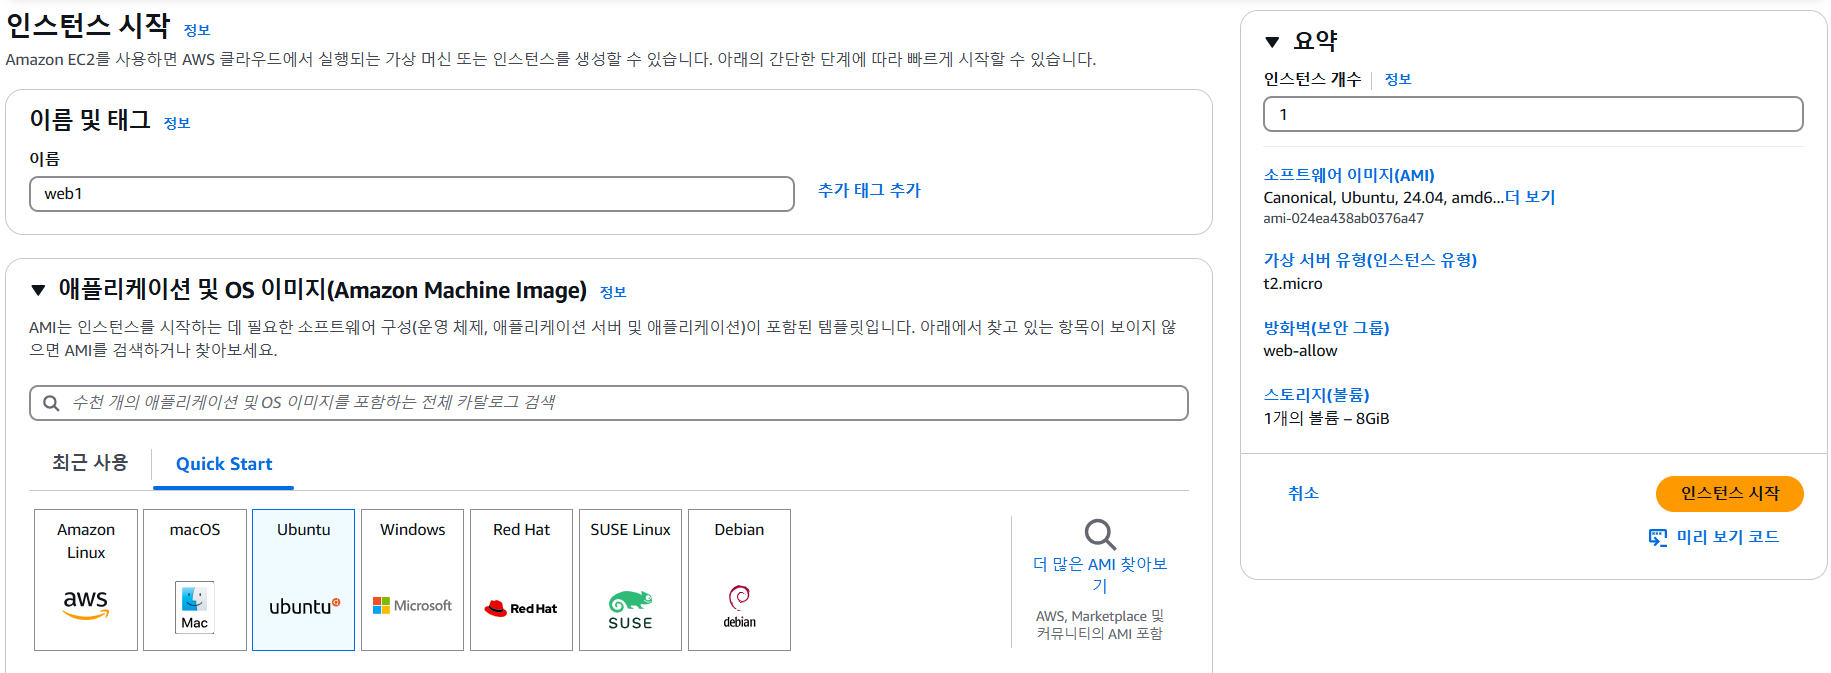
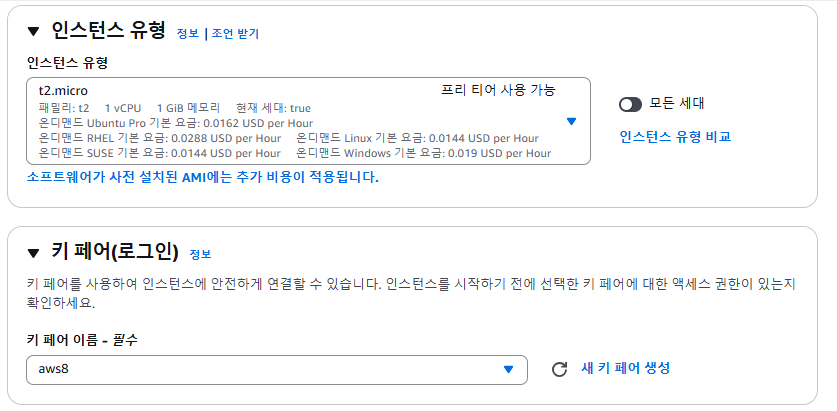
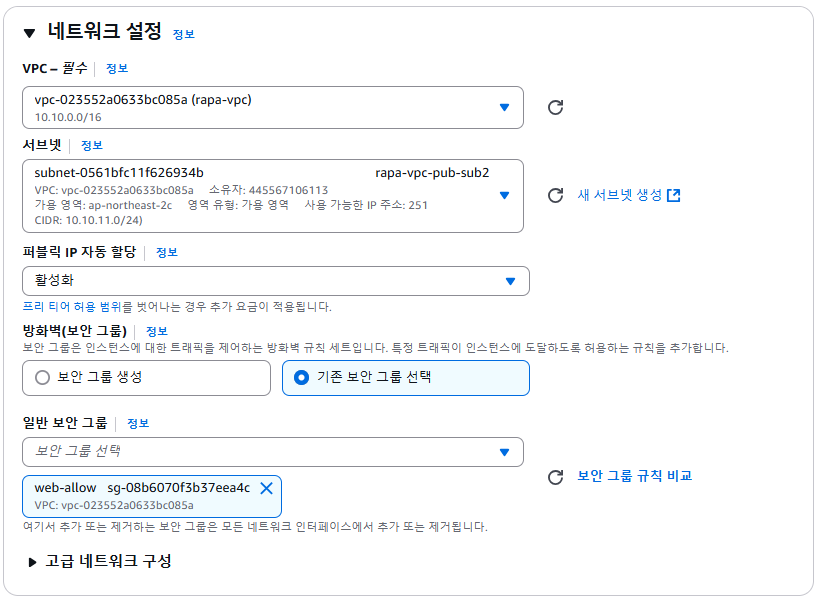
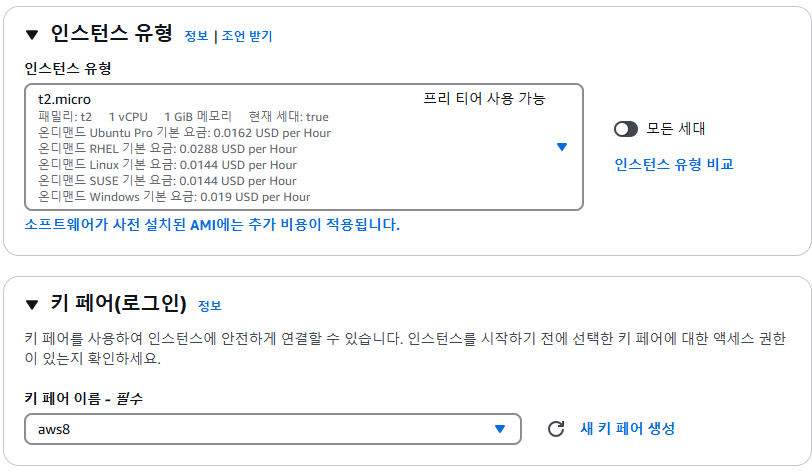
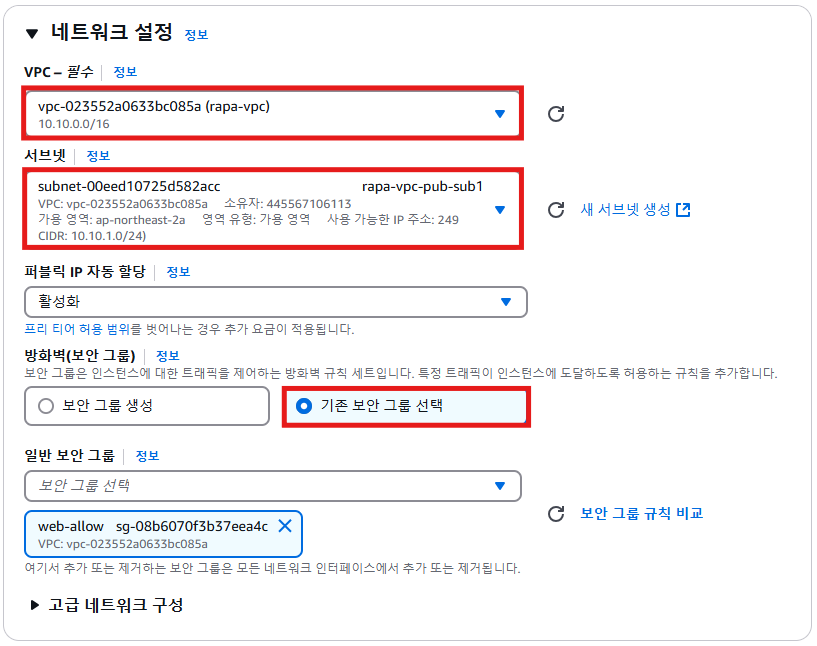
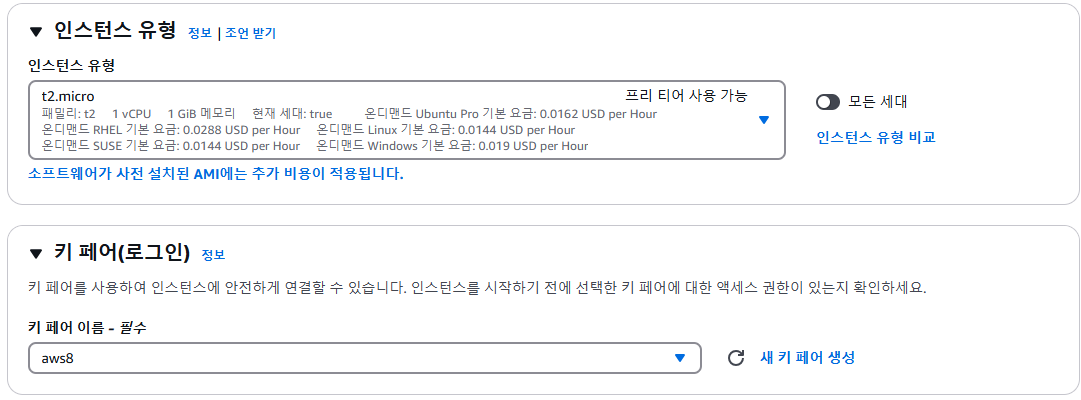
5. 두 개 이상의 인스턴스 생성 - tom1, tom2, tom3
- AMI 선택
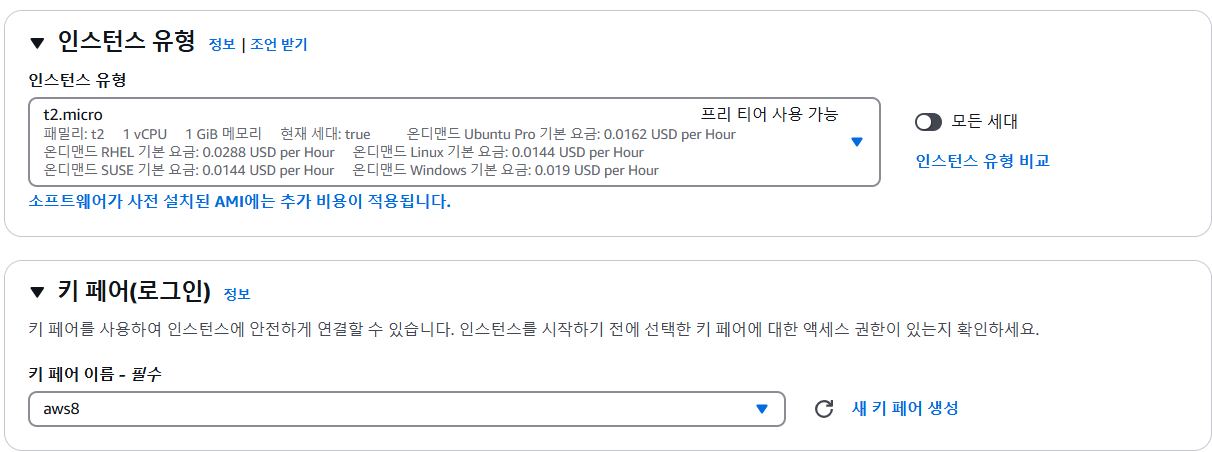
- 인스턴스 유형 & 키페어 선택
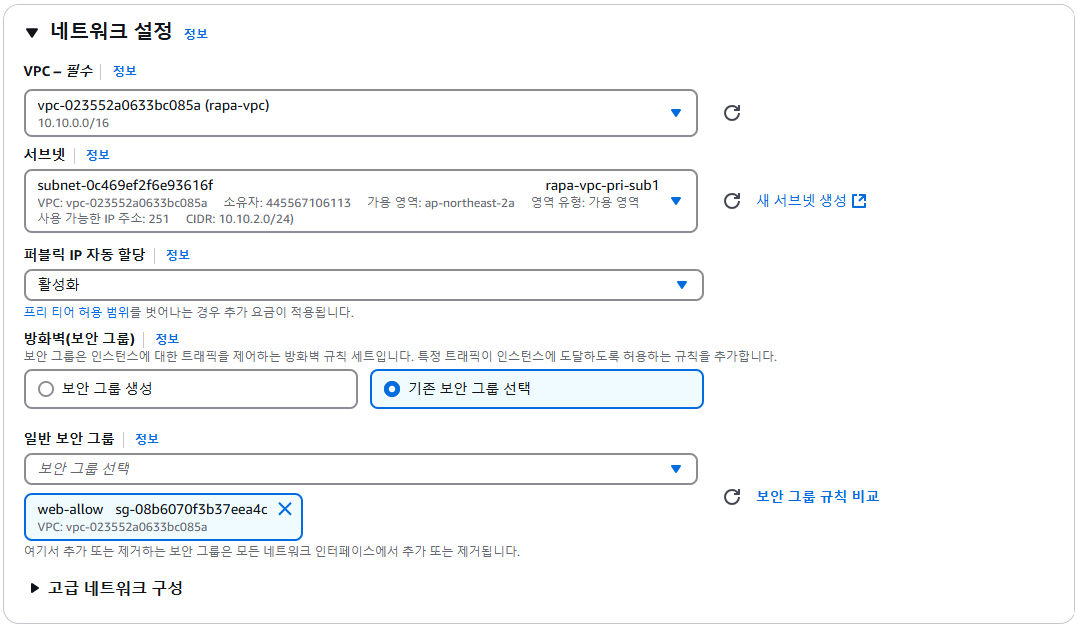
- 네트워크 설정
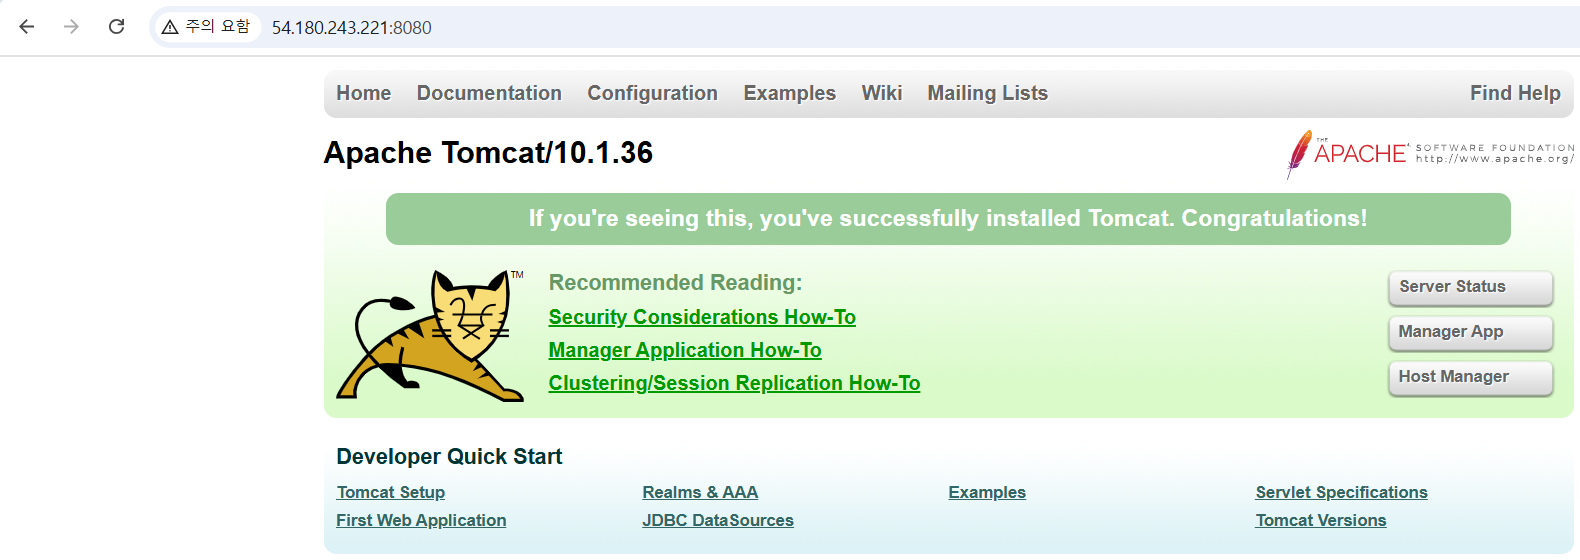
- 인스턴스 작동 확인
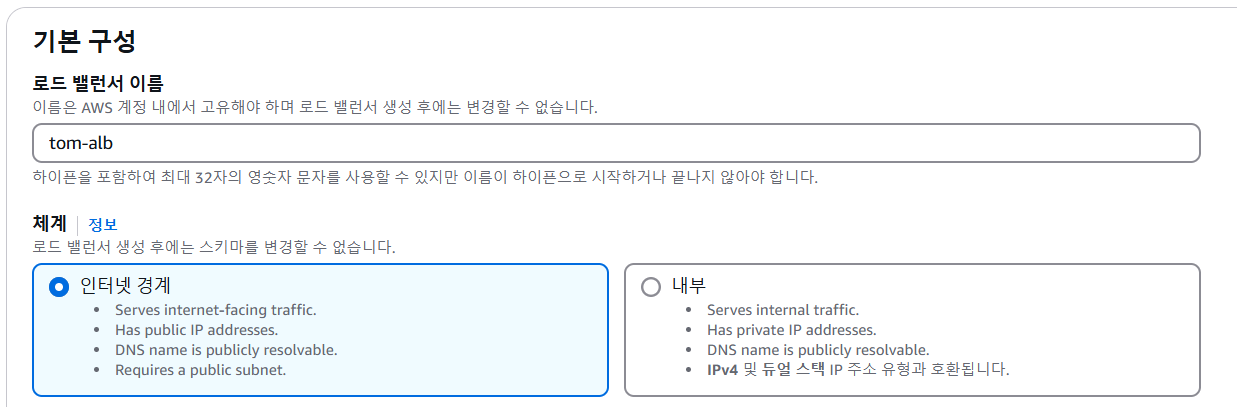
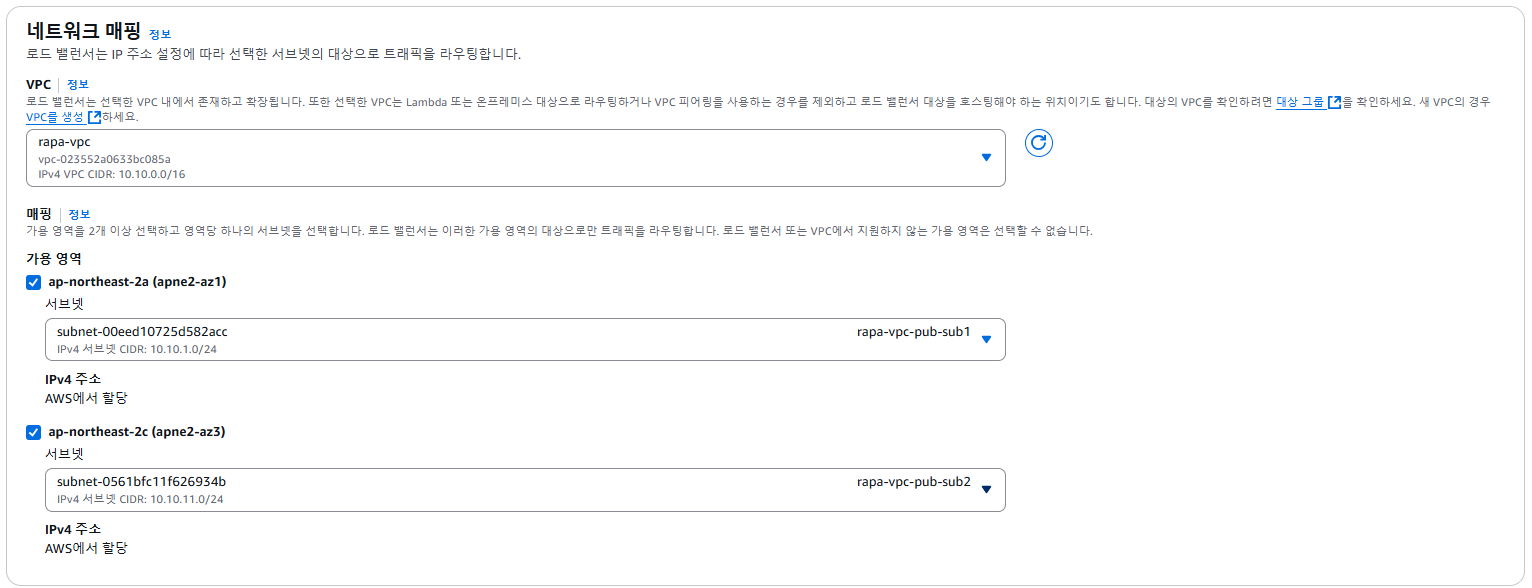
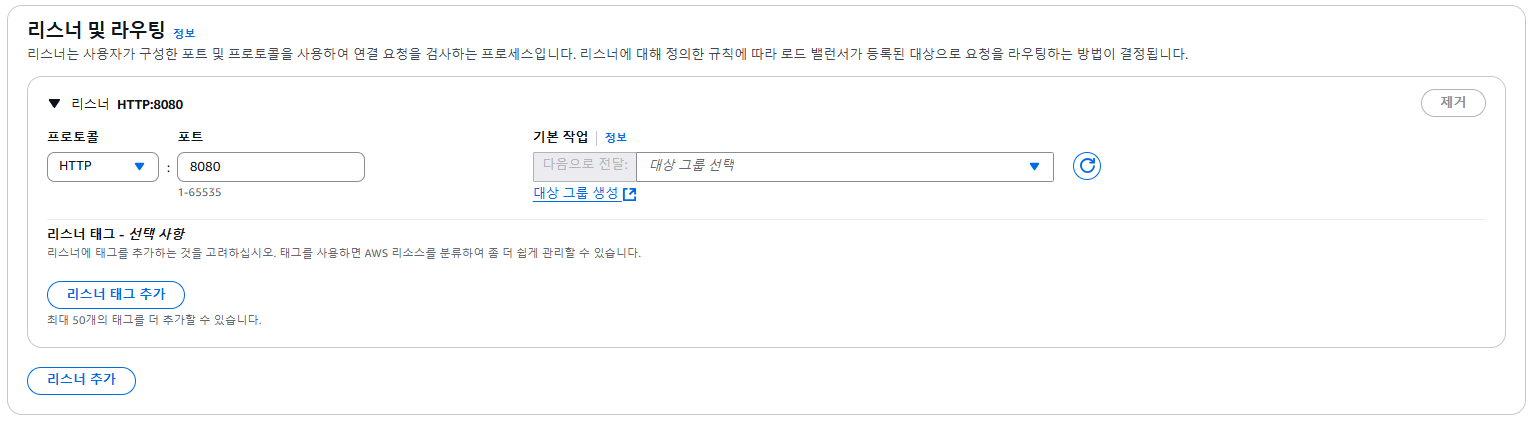
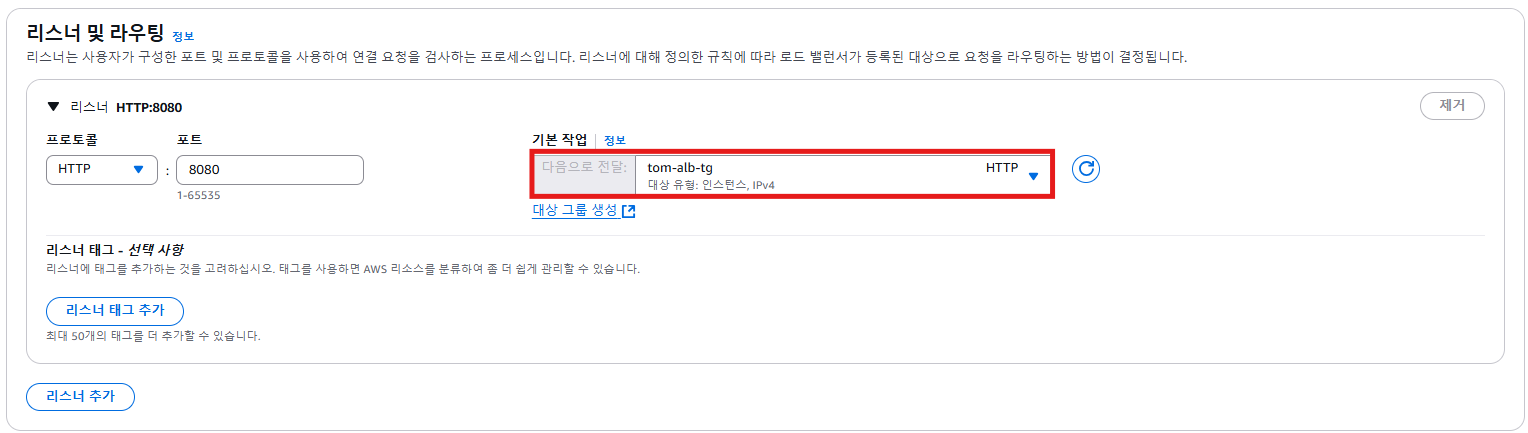
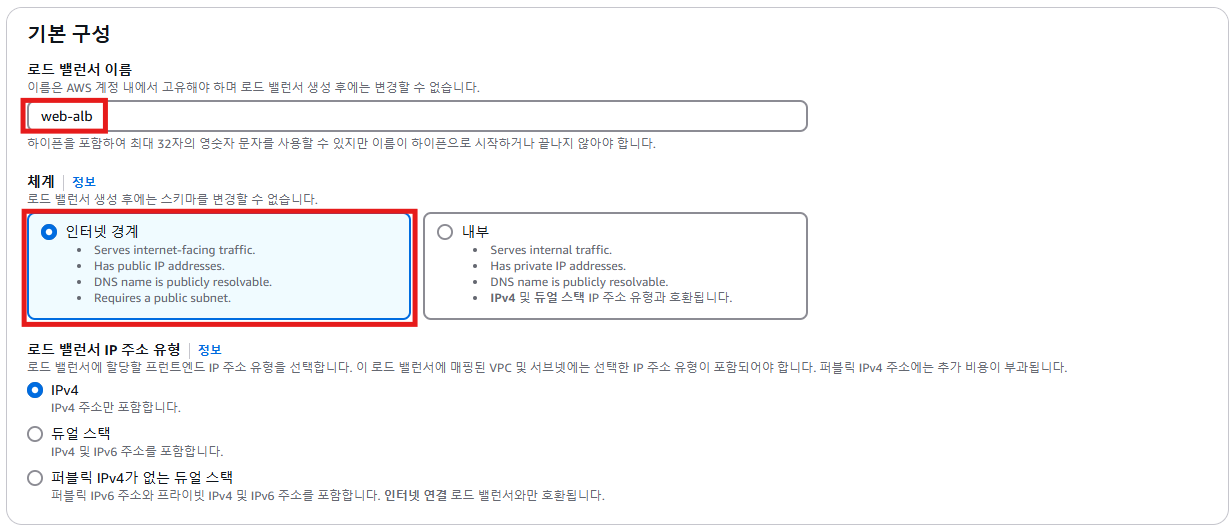
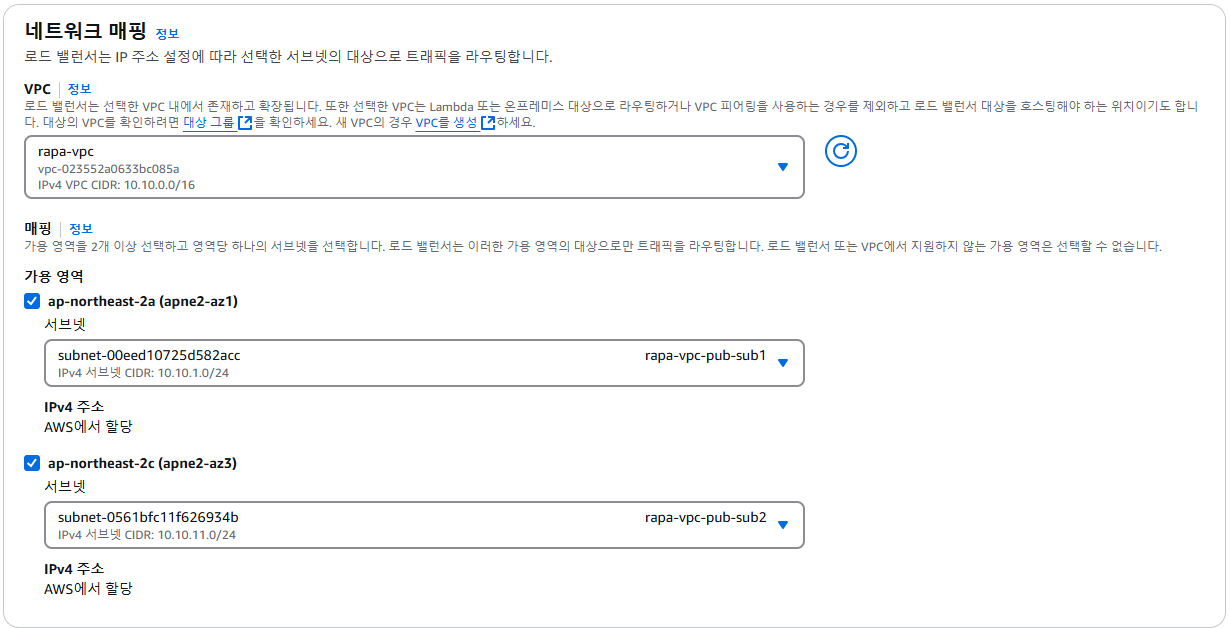
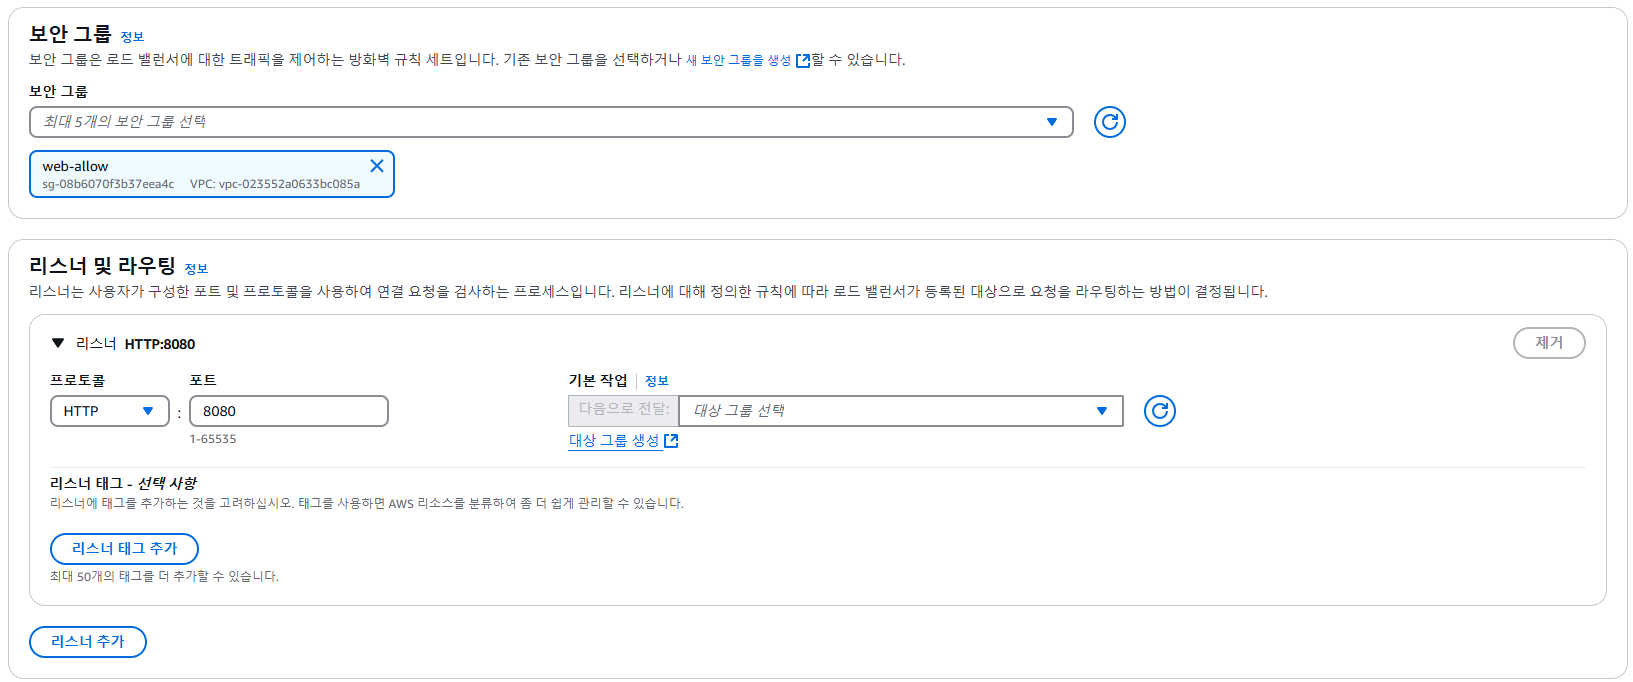
6. ALB 생성
- 보안 그룹
- 리스너 및 라우팅
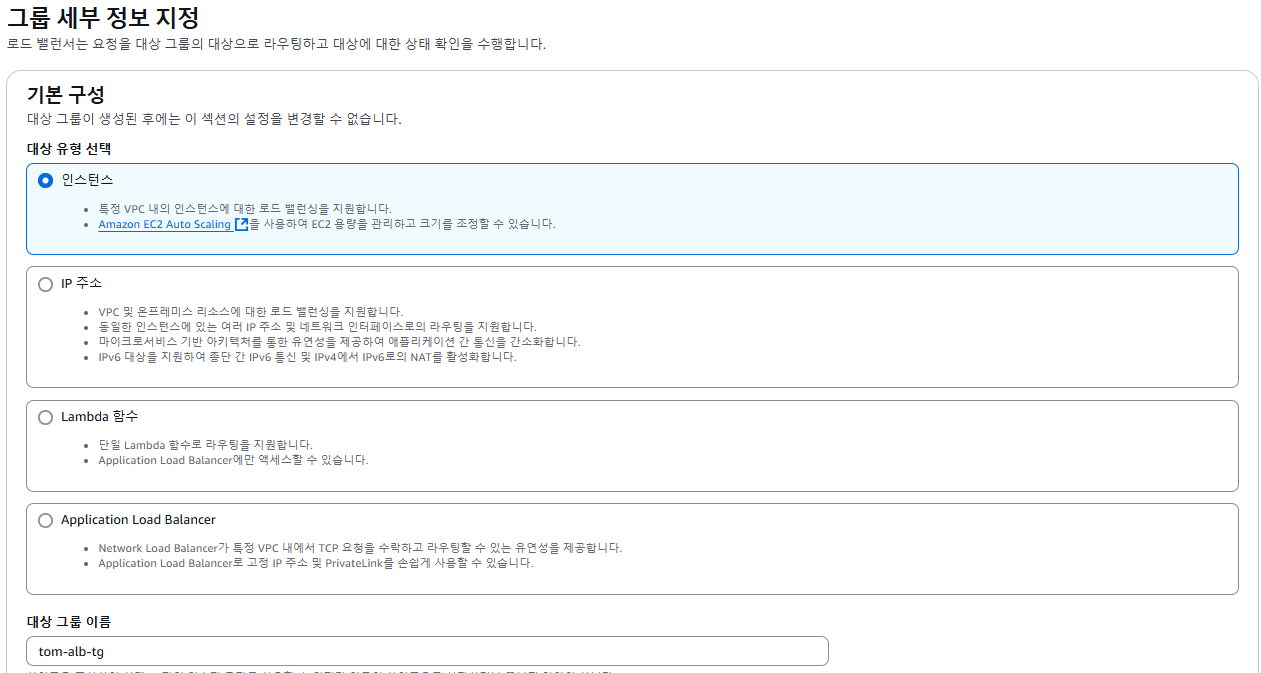
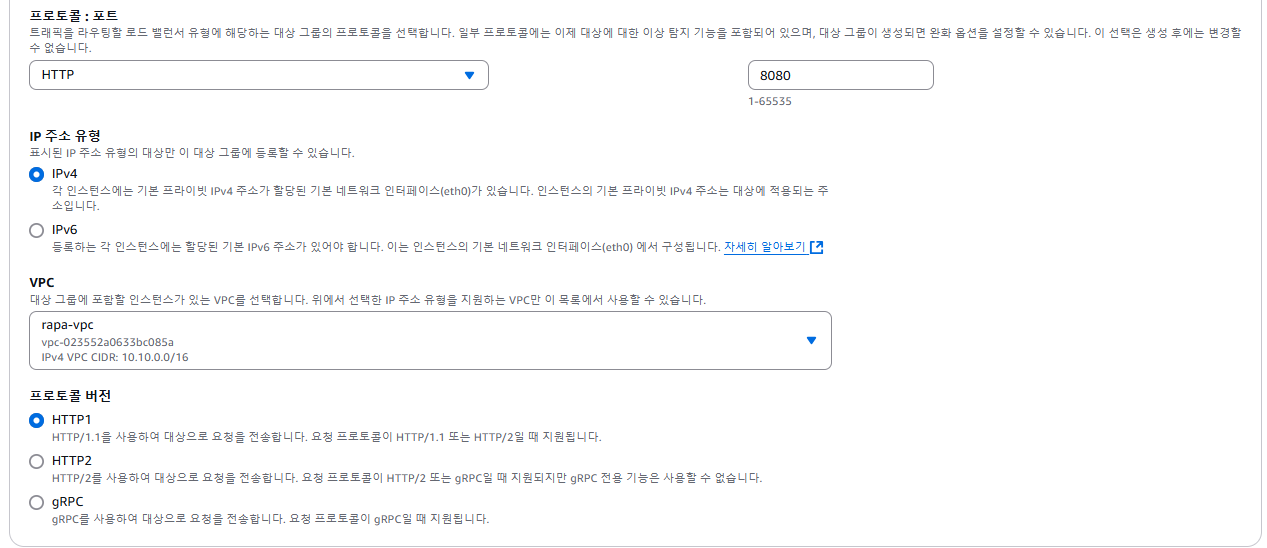
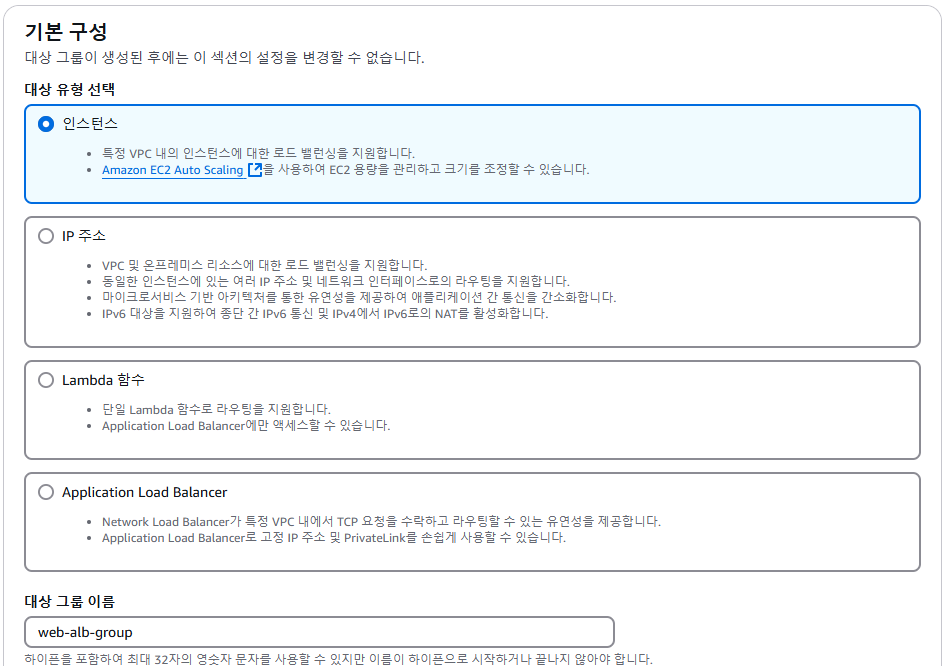
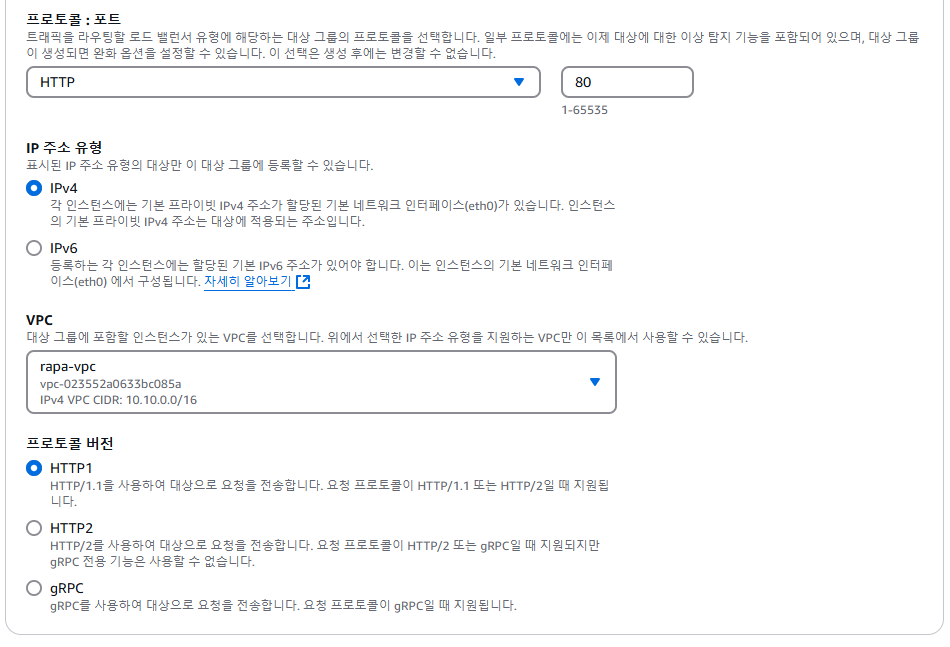
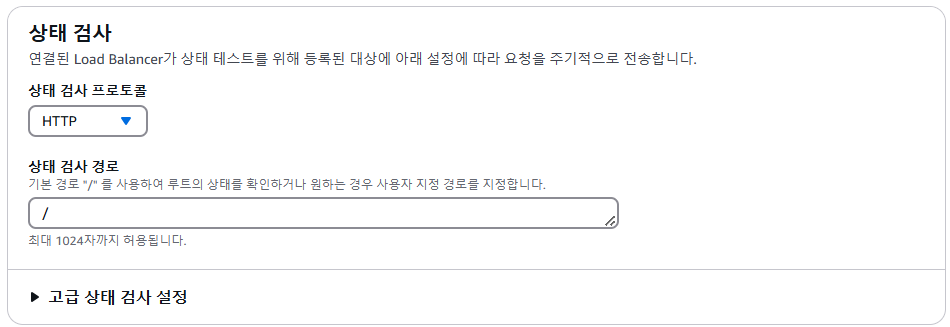
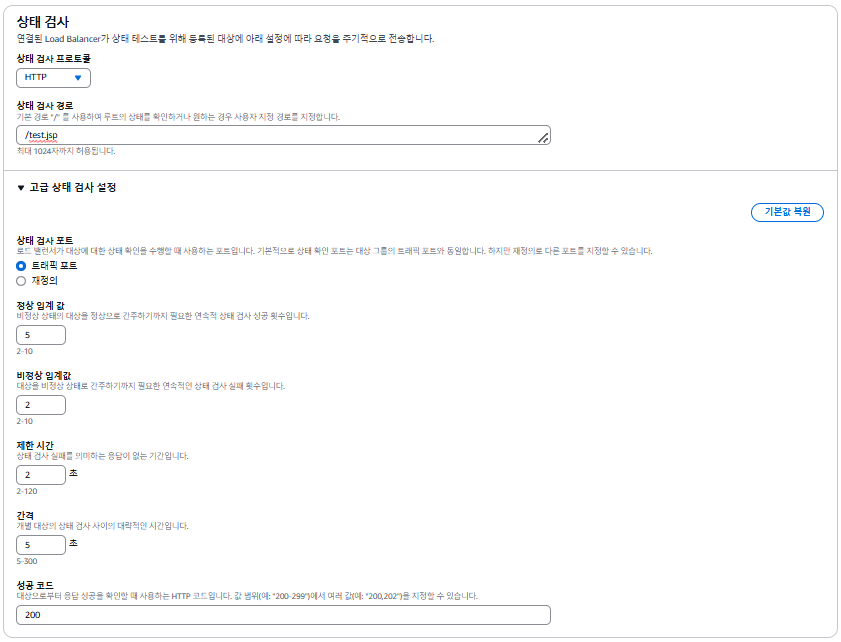
대상그룹 생성
7. 로드밸런싱 되는 것 확인
ELB 실습 3
문제
ALB를 만들어보세요.
최소 각각 1쌍 이상의 web, was를 생성하며 DB는 제외한 2 tier 구조를 만들어보세요. ELB를 사용해야 한다면 ALB를 사용하세요. 사용자는 web의 /tomcat 경로로 접속했을 때, was로 리버스 프록시 되어야 합니다. tomcat은 systemd를 통해 데몬으로 만드세요.
최소 4개의 인스턴스 생성(최소 web -2개, was 2개)
systemd ➡️ Ubuntu 설치
public subnet - alb 1개 (web) / private subnet - alb 1개 (was)
실습
더보기
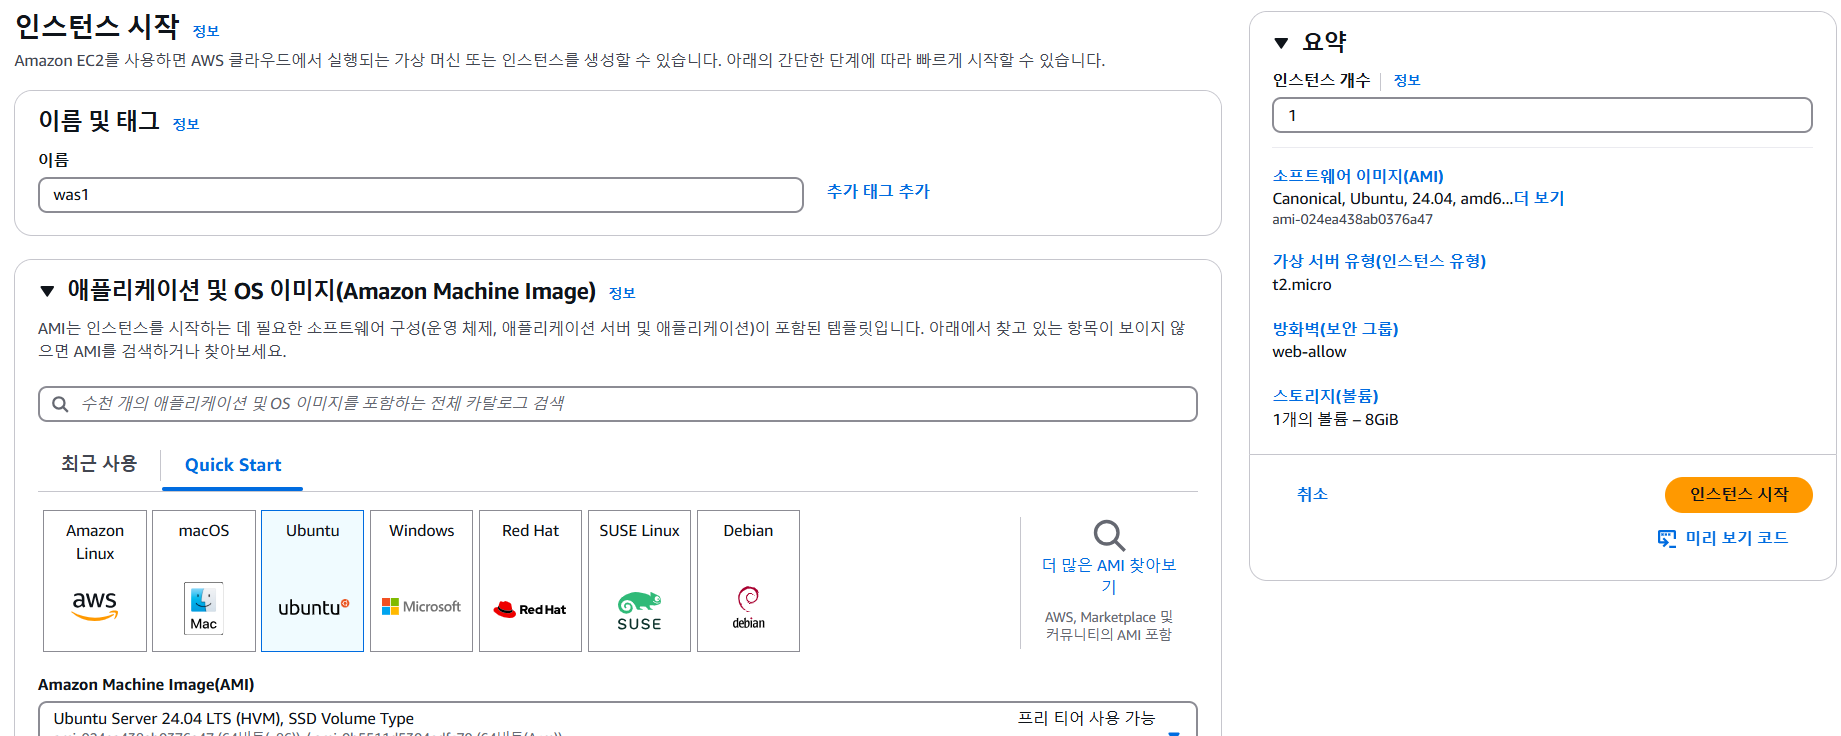

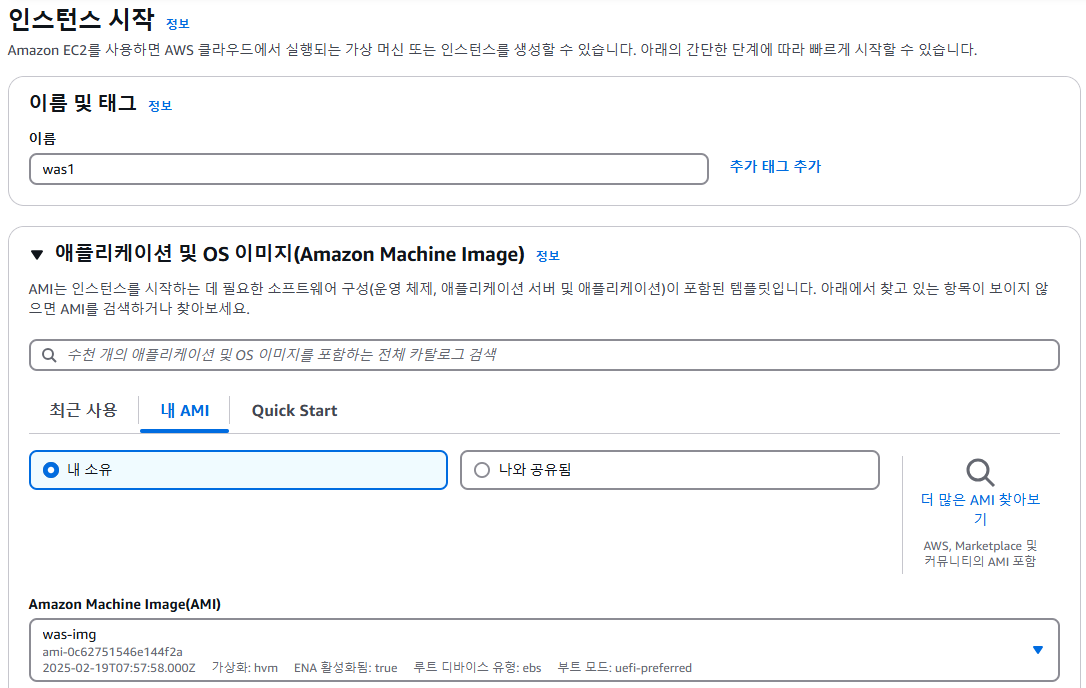
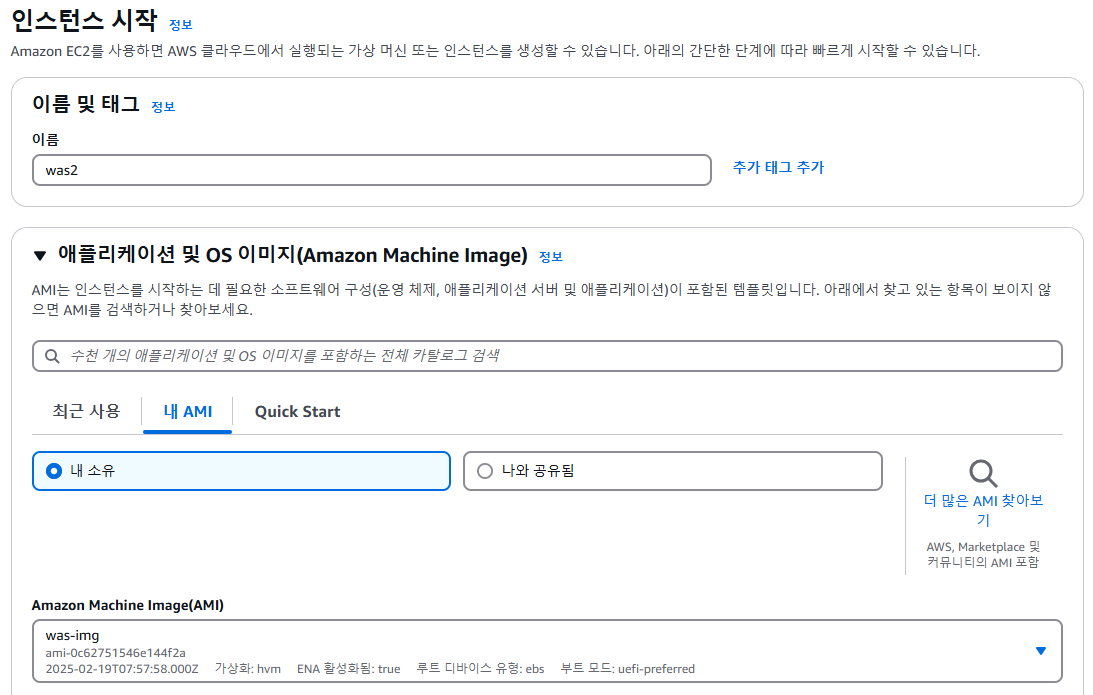


1. 각 인스턴스 생성 - web1, web2, was1, was2
- web1
- was1
2. web1 설정
- 관리자 권한 & apt 업데이트
ubuntu@ip-10-10-1-116:~$ sudo -i
root@ip-10-10-1-116:~# apt update -y- nginx 설치
root@ip-10-10-1-116:~# apt install -y nginx- 재부팅 & 재부팅시, 데몬 유지 설정
root@ip-10-10-1-116:~# systemctl restart nginx
root@ip-10-10-1-116:~# systemctl enable nginx
Synchronizing state of nginx.service with SysV service script with /usr/lib/systemd/systemd-sysv-install.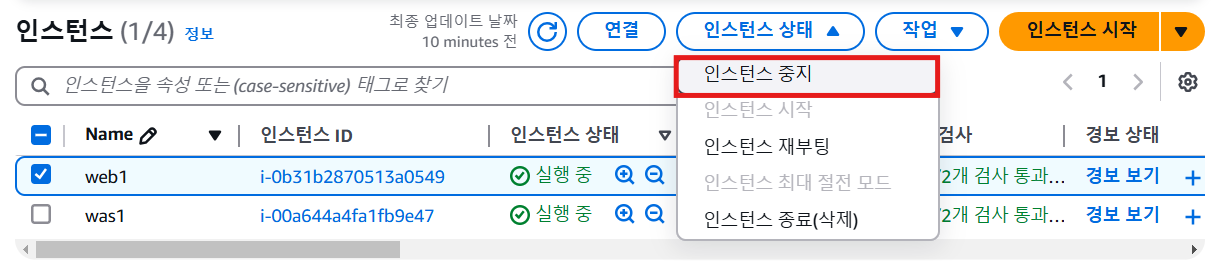
Executing: /usr/lib/systemd/systemd-sysv-install enable nginx- 인스턴스 중지
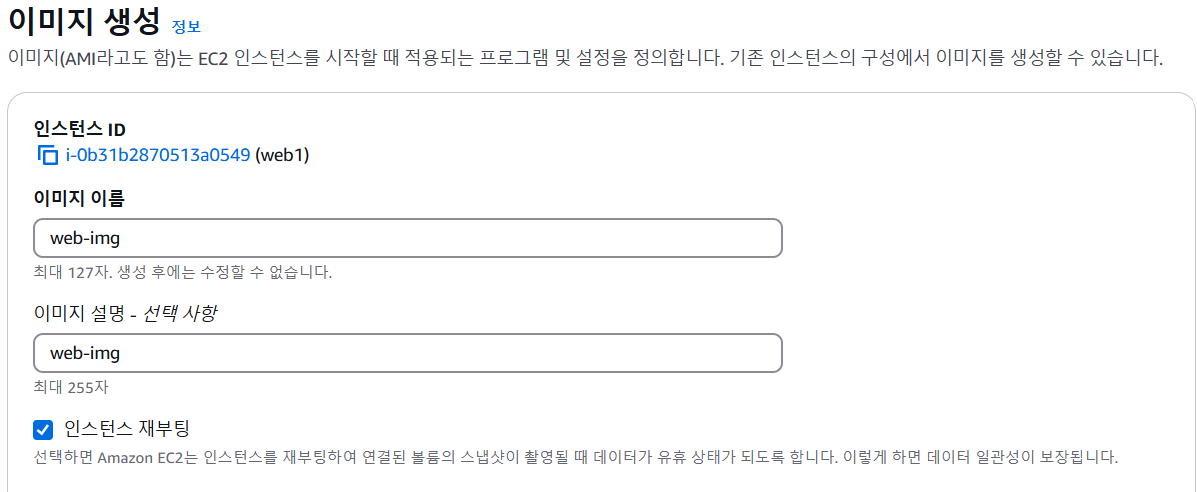
- web AMI 이미지 만들기
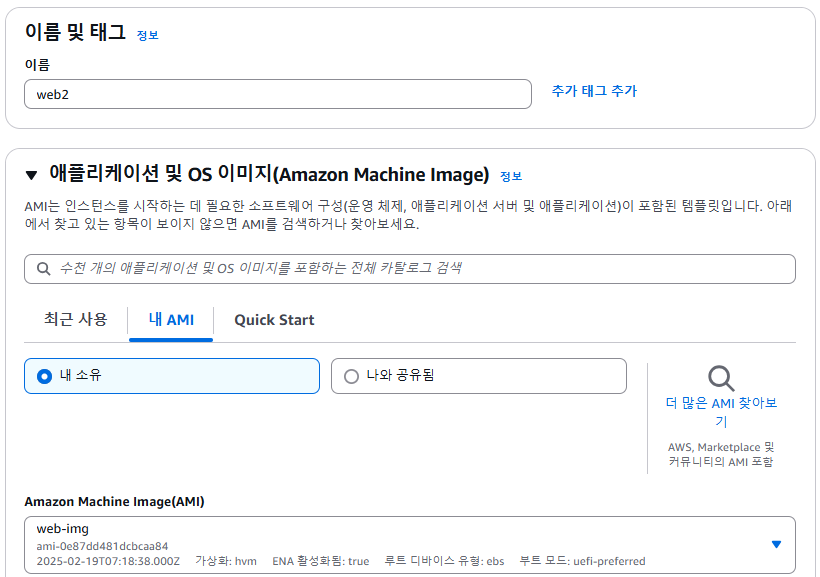
3. web2 생성 - AMI 활용
- 인스턴스 명 & AMI 선택
- 인스턴스 유형 & 키페어 설정
- 네트워크 설정
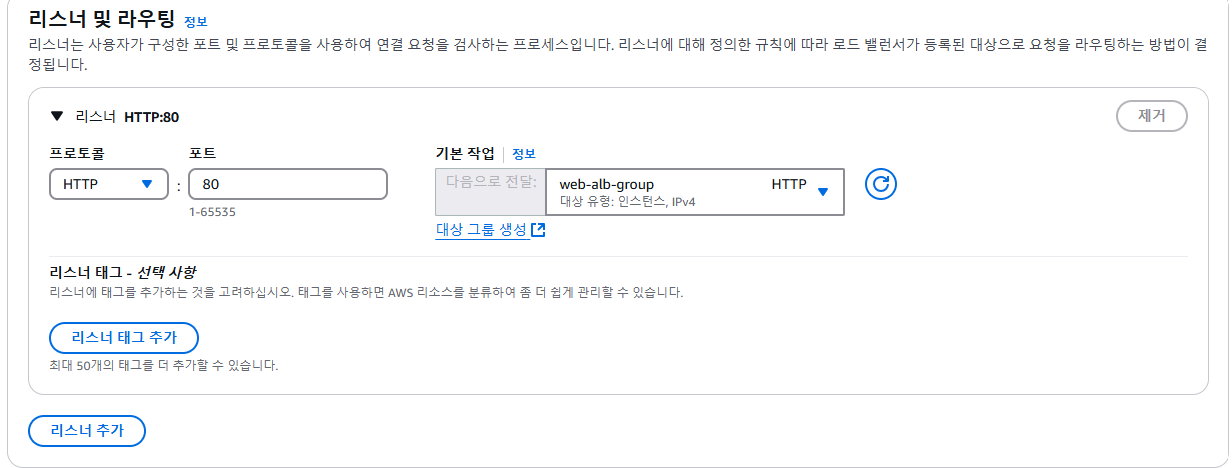
4. web-alb 생성
- ELB - ALB 선택
- 네트워크 매핑
- 보안그룹 & 리스너 및 라우팅 설정
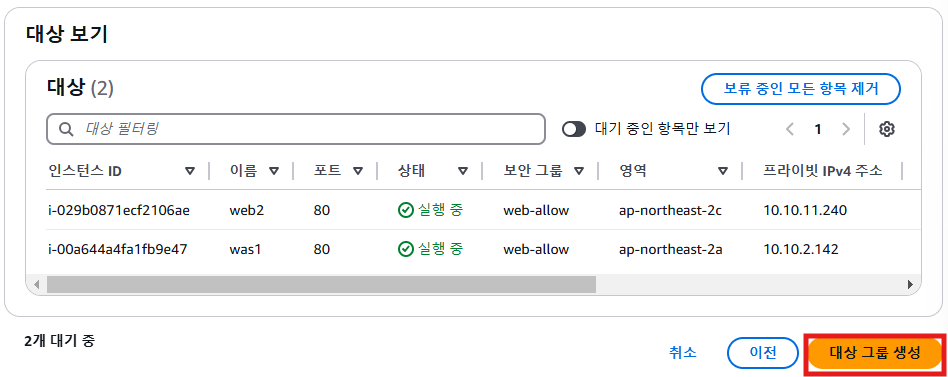
대상그룹 생성
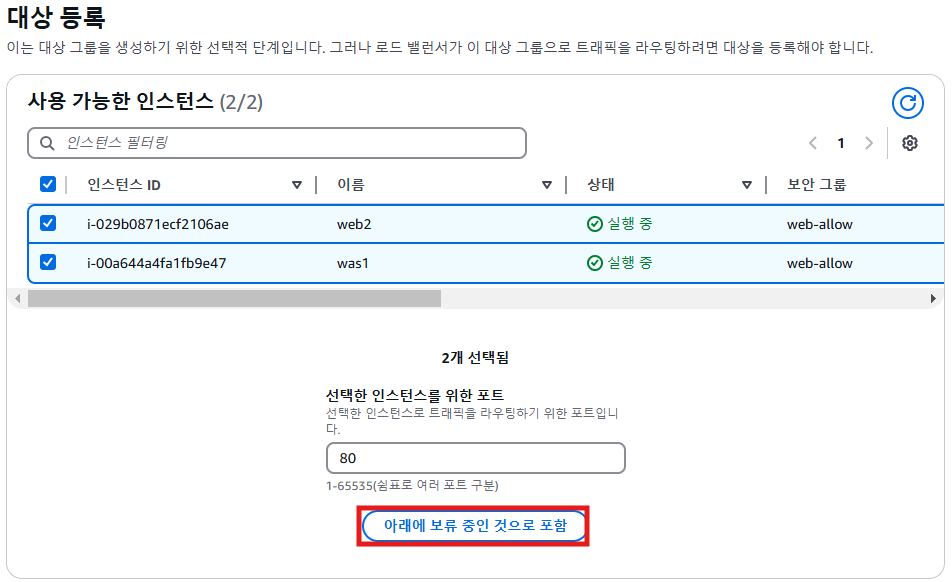
- 대상 등록
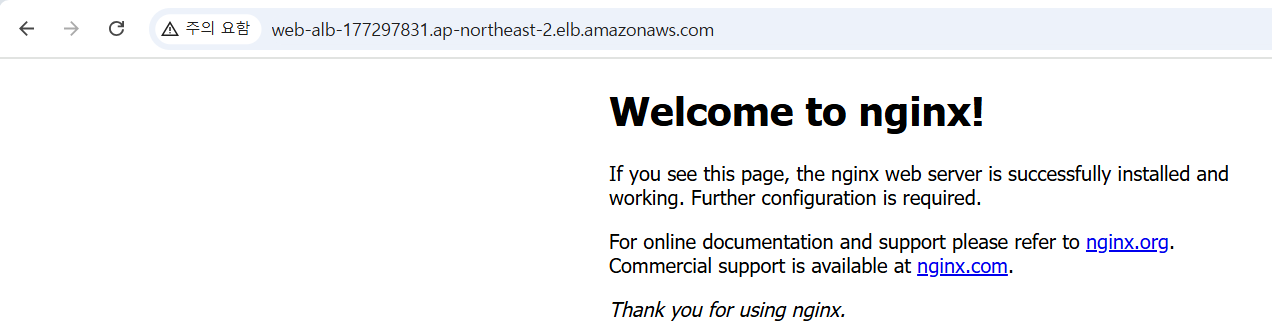
- web 접속 확인
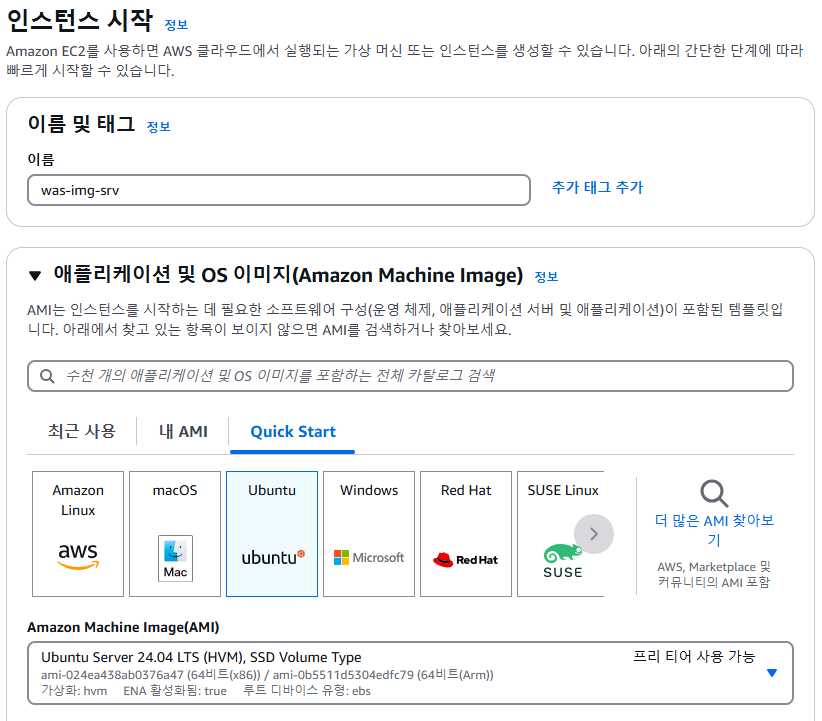
5.was AMI 생성
- public subnet에 두고 패키지 설치하기
- 관리자 권한 & apt 업데이트
ubuntu@ip-10-10-1-214:~$ sudo -i
root@ip-10-10-1-214:~# apt update -y- 패키지 설치
root@ip-10-10-1-214:~# apt install -y wget unzip openjdk-11-jdk
- tomcat 다운로드
root@ip-10-10-1-214:~# wget https://dlcdn.apache.org/tomcat/tomcat-10/v10.1.36/bin/apache-tomcat-10.1.36.zip- tomcat 설정
root@ip-10-10-1-214:~# unzip apache-tomcat-10.1.36.zip

root@ip-10-10-1-214:~# ls
apache-tomcat-10.1.36  apache-tomcat-10.1.36.zip  snap
root@ip-10-10-1-214:~# rm -rf apache-tomcat-10.1.36.zip && mv apache-tomcat-10.1.36/ tomcat
root@ip-10-10-1-214:~# ls
snap  tomcat
root@ip-10-10-1-214:~# chmod -R 777 tomcat- tomcat systemctl 등록
root@ip-10-10-1-214:~# tee /etc/systemd/system/tomcat.service <<EOF
[Unit]
Description=tomcat10
After=network.target syslog.target

[Service]
Type=forking
Environment="/root/tomcat"
User=root
Group=root
ExecStart=/root/tomcat/bin/startup.sh
ExecStop=/root/tomcat/bin/shutdown.sh

[Install]
WantedBy=multi-user.target
EOF
[Unit]
Description=tomcat10
After=network.target syslog.target

[Service]
Type=forking
Environment="/root/tomcat"
User=root
Group=root
ExecStart=/root/tomcat/bin/startup.sh
ExecStop=/root/tomcat/bin/shutdown.sh

[Install]
WantedBy=multi-user.target
- 부팅 설정
root@ip-10-10-1-214:~# systemctl restart tomcat
root@ip-10-10-1-214:~# systemctl enable tomcat
Created symlink /etc/systemd/system/multi-user.target.wants/tomcat.service → /etc/systemd/system/tomcat.service.- test.jsp 생성
root@ip-10-10-1-214:~/tomcat/webapps/ROOT# vi test.jsp

<%@ page language="java" contentType="text/html; charset=UTF-8" pageEncoding="UTF-8" %>
<%@ page import="java.net.InetAddress" %>
<!DOCTYPE html>
<html>
<head>
    <meta charset="UTF-8">
    <title>Server IP Address</title>
</head>
<body>
    <h2>현재 실행 중인 서버의 IP 주소:</h2>
    <p>
        <%
            try {
                String serverIp = InetAddress.getLocalHost().getHostAddress();
                out.println(serverIp);
            } catch (Exception e) {
                out.println("IP 주소를 가져오는 중 오류 발생: " + e.getMessage());
            }
        %>
    </p>
</body>
</html>
- AMI 생성
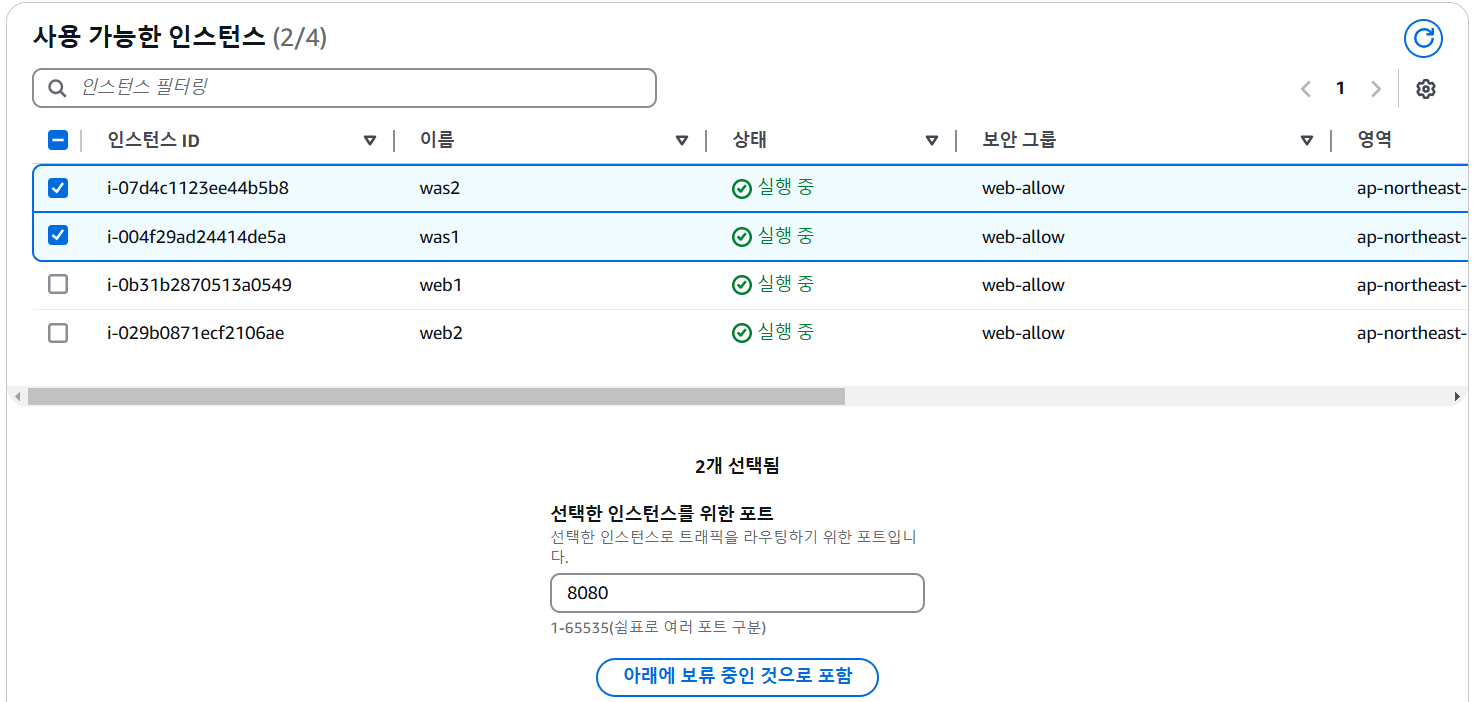
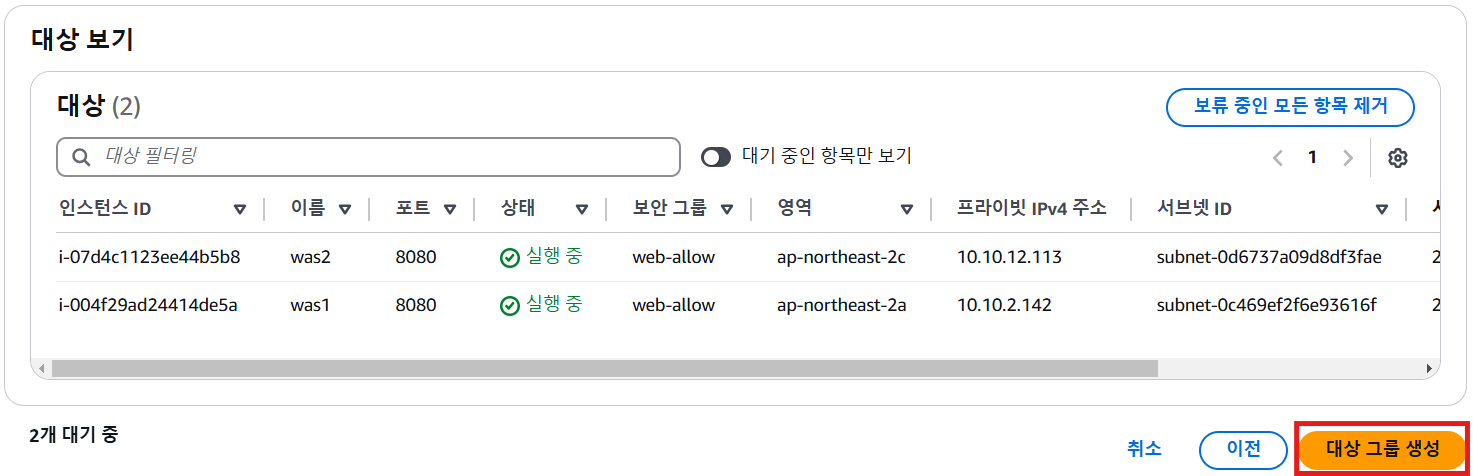
6. was1 & was2 인스턴스 생성
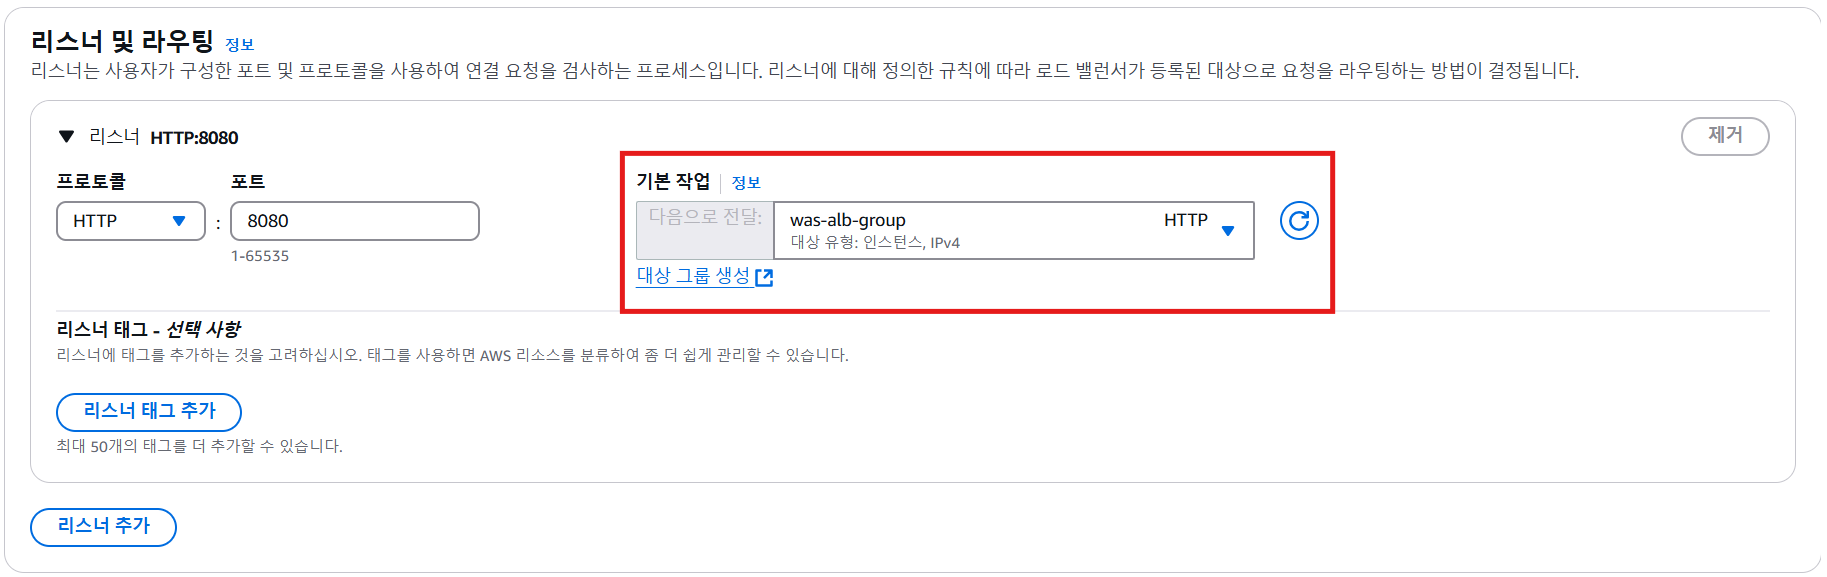
7. was-alb 생성
- 네트워크 매핑
- 보안그룹 & 리스너 및 라우팅
대상그룹 생성
8. web의 reverse proxy 설정
- sites-enabled/default 수정
root@ip-10-10-1-116:~# vi /etc/nginx/sites-enabled/default

server {
        listen 80 default_server;
        listen [::]:80 default_server;

server {
        listen 80;
        listen [::]:80 default_server;
root@ip-10-10-1-116:~# vi /etc/nginx/conf.d/proxy.conf
server {
listen 80;
location /tomcat {
proxy_pass http://internal-was-alb-1013130265.ap-northeast-2.elb.amazonaws.com:8080/; # was의 주소 }
}
root@ip-10-10-1-116:/etc/nginx# systemctl restart nginx
root@ip-10-10-1-116:/etc/nginx# systemctl enable nginx
Synchronizing state of nginx.service with SysV service script with /usr/lib/systemd/systemd-sysv-install.
Executing: /usr/lib/systemd/systemd-sysv-install enable nginx
'CS > AWS' 카테고리의 다른 글
| [AWS] 04-2. 시작 템플릿 & Auto Scaling 실습 (0) | 2025.02.20 |
|---|---|
| [AWS] 04-1. 시작 템플릿 & Auto Scaling (0) | 2025.02.20 |
| [AWS] 03-1. Custom AMI & ELB(ALB, NLB) (0) | 2025.02.19 |
| [AWS] 01. AWS & VPC(Virtual Private Cloud) (1) | 2025.02.18 |
| [AWS Technical Esscentials] 02. AWS 서비스 관리 & 공동 책임 모델& AWS IAM(Identity and Access Management) (0) | 2025.01.30 |
'CS/AWS' Related Articles
more


