
| 일 | 월 | 화 | 수 | 목 | 금 | 토 |
|---|---|---|---|---|---|---|
| 1 | 2 | 3 | 4 | 5 | ||
| 6 | 7 | 8 | 9 | 10 | 11 | 12 |
| 13 | 14 | 15 | 16 | 17 | 18 | 19 |
| 20 | 21 | 22 | 23 | 24 | 25 | 26 |
| 27 | 28 | 29 | 30 | 31 |
- EC2
- linux
- eks
- NAT
- aws saa
- GNS3
- EC2 인스턴스
- FTP
- aws cloud school
- SAA-C03
- vmware
- ALB
- tftp
- aws cloud
- docker
- NLB
- 3 TIER
- DNS
- Ebs
- aws SAA-c03
- aws cloud school 8
- aws cloud shcool 8
- IAM
- 네트워크
- AWS 자격증
- Firewall
- Troubleshooting
- Kubernetes
- AWS
- vyos
- Today
- Total
나의 공부기록
[Docker] 06. Docker Compose 본문
❗Docker Compose 시작 전, 설정
💡docker0 인터페이스 자동 재시작 스크립트
root@host:~# sudo tee /root/check_ip_and_restart_docker.sh<<EOF
> #!/bin/bash
>
> if ! ip add | grep -q 172.17; then
> systemctl restart docker
> fi
> EOF
#!/bin/bash

if ! ip add | grep -q 172.17; then
systemctl restart docker
fi

root@host:~# chmod 777 /root/check_ip_and_restart_docker.sh

root@host:~# crontab -e
no crontab for root - using an empty one

Select an editor.  To change later, run 'select-editor'.
  1. /bin/nano        <---- easiest
  2. /usr/bin/vim.basic
  3. /usr/bin/vim.tiny
  4. /bin/ed

Choose 1-4 [1]: 2
crontab: installing new crontab

* * * * * /root/check_ip_and_restart_docker.sh
[ 원본 서식]
sudo tee /root/check_ip_and_restart_docker.sh<<EOF
#!/bin/bash

if ! ip add | grep -q 172.17; then
	systemctl restart docker
fi
EOF
💡 yaml 파일의 들여 쓰기 설정 수정
➡️ 두칸 들여 쓰기 & 엔터 치면 바로 아래서 입력되도록 수정
root@host:~# vi ~/.vimrc

" Enable file type detection
filetype on

" Enable syntax highlighting
syntax on

" Enable auto-indentation for YAML files
autocmd FileType yaml setlocal autoindent smartindent expandtab shiftwidth=2 tabstop=2
autocmd FileType yml setlocal autoindent smartindent expandtab shiftwidth=2 tabstop=2
Docker Compose - build & run
- 단일 호스트에서 여러 개의 컨테이너를 동시 생성(docker compose up)
- ↔️Docker : 단일 호스트에서 단일 컨테이너를 생성(docker run)
- yaml을 통해 내가 띄울 여러 개의 컨테이너를 정의
Docker Compose 생성 및 기본 동작
1. Docker-compose.yml 파일 생성
# 위치 확인
root@host:/compose# pwd
/compose

# Docker compose 설정
root@host:/compose# vi docker-compose.yml

services:
# 내가 띄울 다양한 컨테이너들
  webserver:
# 서비스의 이름
    image: nginx
    # '-'이면 요소 중 하나를 의미
    ports:
    - '8787:80'
# -p 옵션과 빗스
    networks:
    - webnet
# 밑에서 생성한 네트워크 선택

networks:
  webnet:
# 네트워크 생성


↔️ docker
root@host:/compose# docker run <컨테이너 이름> <베이스 이미지>
2. Docker Compose 생성
root@host:/compose# docker compose up
[+] Running 8/8
 ✔ webserver Pulled                                           5.9s
   ✔ 6e909acdb790 Already exists                              0.0s
   ✔ 5eaa34f5b9c2 Already exists                              0.0s
   ✔ 417c4bccf534 Already exists                              0.0s
   ✔ e7e0ca015e55 Already exists                              0.0s
   ✔ 373fe654e984 Already exists                              0.0s
   ✔ 97f5c0f51d43 Already exists                              0.0s
   ✔ c22eb46e871a Already exists                              0.0s
[+] Running 2/2
3. Docker Compose 생성 확인
- docker compose ps는 compose 파일이 있는 경로에서 사용해야 함 ➡️ 디렉토리 기준❗
root@host:/compose# pwd
/compose

root@host:/compose# docker compose ps
NAME                  IMAGE     COMMAND                  SERVICE     CREATED          STATUS              PORTS
compose-webserver-1   nginx     "/docker-entrypoint.…"   webserver   16 minutes ago   Up About a minute   0.0.0.0:8787->80/tcp, [::]:8787->80/tcp

root@host:~# docker compose ls
NAME                STATUS              CONFIG FILES
compose             running(1)          /compose/docker-compose.yml
4. Docker Compose Network 생성 확인
- docker compose 파일에서 정의한 webnet이라는 네트워크 생성 확인
root@host:/compose# docker network ls
NETWORK ID     NAME             DRIVER    SCOPE
854b414de7f1   bridge           bridge    local
9f75cb14c9b3   compose_webnet   bridge    local
9754215ebb6d   host             host      local
acc770ab6373   none             null      local
5. Docker Compose 삭제
root@host:/compose# docker compose down
[+] Running 2/2
 ✔ Container compose-webserver-1  Removed                     0.2s
 ✔ Network compose_webnet         Removed                     0.1s

 root@host:/compose# docker network ls
NETWORK ID     NAME      DRIVER    SCOPE
854b414de7f1   bridge    bridge    local
9754215ebb6d   host      host      local
acc770ab6373   none      null      local
6. Docker Compose 파일 수정
root@host:/compose# vi docker-compose.yml

services:
# 내가 띄울 다양한 컨테이너들
  webserver:
# 서비스의 이름
    image: nginx
    # '-'이면 요소 중 하나를 의미
    ports:
    - '8787:80'
# -p 옵션과 빗스
    networks:
    - webnet
# 밑에서 생성한 네트워크 선택
    volumes:
    - ./vtest:/usr/share/nginx/html
# host의 ./vtest를 컨테이너의 /usr/share/nginx/html에 마운트

networks:
  webnet:
# 네트워크 생성
7. Docker Compose 백그라운드 실행
# -d : 백그라운드 실행
root@host:/compose# docker compose up -d
[+] Running 2/2
 ✔ Network compose_webnet         Created                     0.0s
 ✔ Container compose-webserver-1  Started                     0.2s

# vtest 생성 확인 가능 ➡️ volume 옵션으로 마운트 포인트 자동 생성
root@host:/compose# ls
docker-compose.yml  vtest
root@host:/compose# echo vtest > vtest/index.html
💡 Docker Compose 옵션
networks:
# 네트워크 정의 및 선택
ports:
# publish 옵션
command:
# CMD
# Dockerfile의 CMD가 무시되고 docker-compose.yml에서 정의한 command가 실행됨
environment:
# -e, 환경변수
# 환경변수가 저장된 파일을 지정할 수도 있음
depends_on:
# A라는 서비스에 B에 대한 depends_on을 걸어주면, B ➡️ A 생성
# 순서 제어 가능
# Ex) nodejs 앱 배포의 경우, MongoDB가 연동이 안되면 앱 자체가 다운됨
➡️ nodejs 서비스를 생성하면서 MongoDB를 depends_on으로 걸어야 함
실습 - 01
문제
위 명령어를 활용하여, ubuntu:latest를 동작시키는 compose 파일을 만들어보세요.
[ 조건 ]
- 네트워크 : ubun_net
풀이
1. docker-compose.yml 파일 생성
root@host:/compose/ubuntu# vi  docker-compose.yml

services:
  ubun:
    image: ubuntu:latest
    networks:
    - ubun_net
    command: "sleep 200"

networks:
  ubun_net:
2. Docker Compose 실행
root@host:/compose/ubuntu# docker compose up -d
[+] Running 1/1
 ✔ Container ubuntu-ubun-1  Star...                           0.2s
3. 동작 확인
root@host:/compose/ubuntu# docker compose ls
NAME                STATUS              CONFIG FILES
compose             running(1)          /compose/docker-compose.yml
ubuntu              running(1)          /compose/ubuntu/docker-compose.yml
Docker Compose - command 옵션
- 컨테이너
root@host:/compose/ubuntu# vi docker-compose.yml

services:
  ubun:
    image: ubuntu:latest
    networks:
    - ubun_net
    command: "sleep infinity"

networks:
  ubun_net:


root@host:/compose/ubuntu# docker compose up -d
[+] Running 1/1
 ✔ Container ubuntu-ubun-1  Star...                          10.4s

 # 컨테이너 재생성
 root@host:/compose/ubuntu# docker compose ps
NAME            IMAGE           COMMAND            SERVICE   CREATED          STATUS          PORTS
ubuntu-ubun-1   ubuntu:latest   "sleep infinity"   ubun      45 seconds ago   Up 34 seconds
Docker Compose - Environment 옵션
1. docker-compose.yml 생성
root@host:/compose/ubuntu# vi docker-compose.yml

services:
  ubun:
    image: ubuntu:latest
    networks:
    - ubun_net
    environment:
      # 방법1️⃣
      ENV_TEST: 'test'
      # 방법2️⃣
      - ENV_TEST=test
    command: "sleep infinity"

networks:
  ubun_net:
2. Docker Compose 생성
- -d 옵션 빼먹으면 안됨
root@host:/compose/ubuntu# docker compose -d- Docker Compose에서는 --link를 굳이 명시하지 않아도 '서비스의 이름'으로 찾아갈 수 있음
실습 - 02
문제
mysql:8, wordpress:latest를 베이스 이미지로 하여 Dockerfile은 쓰지 않고, docker-compose.yml 파일을 구성해 보세요. publish 포트는 wordpress 1234로 하시고, mysql은 없다.
풀이
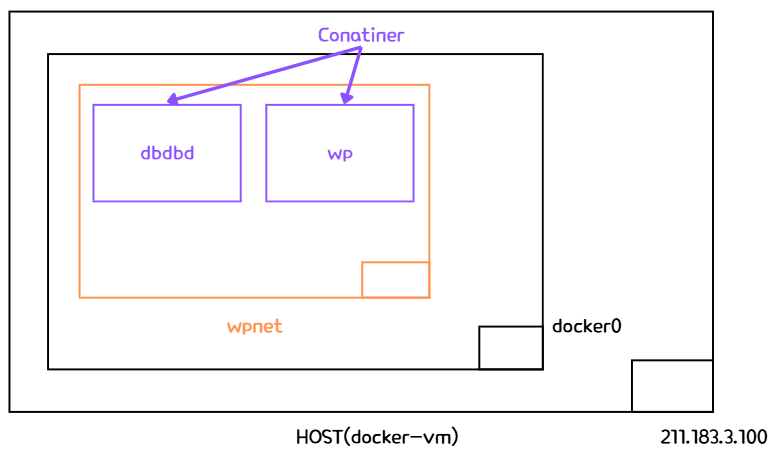
1. docker-compose.yml 생성
- network를 명시하지 않으면 자동으로 만든다.
- docker-compose가 서비스의 이름으로 찾아갈 수 있도록 알아서 관리해줌
root@host:/compose/exam01# vi docker-compose.yml

services:
  dbdb:
    image: mysql:8
    networks:
    - dbwpnet
    restart: always
    environment:
      MYSQL_ROOT_PASSWORD: '1234'
      MYSQL_USER: 'wpuser'
      MYSQL_PASSWORD: '1234'
      MYSQL_DATABASE: 'wpdb'
  wp:
    image: wordpress:latest
    ports:
    - '1234:80'
    networks:
    - dbwpnet
    depends_on:
    - dbdb
    restart: always

    #❗ docker compose는 서비스 이름으로 컨테이너를 찾아갈 수 있음
    environment:
      WORDPRESS_DB_HOST: dbdb
      WORDPRESS_DB_USER: 'wpuser'
      WORDPRESS_DB_PASSWORD: '1234'
      WORDPRESS_DB_NAME: 'wpdb'

networks:
  dbwpnet:
2. docker compose 생성
root@host:/compose/exam01# docker compose up -d
[+] Running 3/3
 ✔ Network exam01_dbwpnet   Creat...                          0.0s
 ✔ Container exam01-dbdb-1  Star...                           0.2s
 ✔ Container exam01-wp-1    Starte...                         0.4s
3. 결과 확인
root@host:/compose/exam01# docker compose ps
NAME            IMAGE              COMMAND                  SERVICE   CREATED         STATUS         PORTS
exam01-dbdb-1   mysql:8            "docker-entrypoint.s…"   dbdb      5 seconds ago   Up 4 seconds   3306/tcp, 33060/tcp
exam01-wp-1 wordpress:latest "docker-entrypoint.s…" wp 4 seconds ago Up 4 seconds 0.0.0.0:1234->80/tcp, [::]:1234->80/tcp- DB 컨테이너에 대한 정보를 작성하지 않으면 DB 연결이 되지 않음

➕ 이미 존재하는 네트워크 선택
1. Docker Network 생성
- docker-compose.yml에서 네트워크를 선택하기 위해서, 임의로 네트워크 생성
root@host:/compose/exam01# docker network create wpnet --driver=bridge
ad978b3ac9f10551fd712181f2600433f43f0ad07c87dfb9d962ecbc7801d92f

root@host:/compose/exam01# docker network ls
NETWORK ID     NAME                DRIVER    SCOPE
854b414de7f1   bridge              bridge    local
9754215ebb6d   host                host      local
acc770ab6373   none                null      local
ad978b3ac9f1   wpnet               bridge    local
2. 네트워크 정보 확인
root@host:/compose/exam01# docker network inspect wpnet
[
    {
        "Name": "wpnet",
        "Id": "ad978b3ac9f10551fd712181f2600433f43f0ad07c87dfb9d962ecbc7801d92f",
        "Created": "2025-03-24T02:25:40.394041356Z",
        "Scope": "local",
        "Driver": "bridge",
        "EnableIPv4": true,
        "EnableIPv6": false,
        "IPAM": {
            "Driver": "default",
            "Options": {},
            "Config": [
                {
                    "Subnet": "172.22.0.0/16",
                    "Gateway": "172.22.0.1"
                }
            ]
        },
        "Internal": false,
        "Attachable": false,
        "Ingress": false,
        "ConfigFrom": {
            "Network": ""
        },
        "ConfigOnly": false,
        "Containers": {},
        "Options": {},
        "Labels": {}
    }
]
- 네트워크 생성 시, ip add했을 때, 인터페이스 생성 확인 가능
➡️ publish 및 컨테이너가 외부로 통신할 수 있는 근거가 됨

3. docker-compose.yml에서 wpnet 네트워크 선택
root@host:/compose/exam01# vi docker-compose.yml

services:
  dbdb:
    image: mysql:8
    networks:
    - dbwpnet
    restart: always
    environment:
      MYSQL_ROOT_PASSWORD: '1234'
      MYSQL_USER: 'wpuser'
      MYSQL_PASSWORD: '1234'
      MYSQL_DATABASE: 'wpdb'
  wp:
    image: wordpress:latest
    ports:
    - '1234:80'
    networks:
    - dbwpnet
    depends_on:
    - dbdb
    restart: always
    environment:
      WORDPRESS_DB_HOST: dbdb
      WORDPRESS_DB_USER: 'wpuser'
      WORDPRESS_DB_PASSWORD: '1234'
      WORDPRESS_DB_NAME: 'wpdb'

# 🌟external : 이미 존재하는 네트워크 / name: 네트워크명 명시
networks:
  dbwpnet:
    external:
      name: wpnet

# 위와 같은 의미
networks:
  dbwpnet:
    external: true
서비스에서 이미지를 빌드하는 방법
1. docker-compose.yml 파일 생성
root@host:/compose# mkdir build
root@host:/compose# cd build

root@host:/compose/build# vi docker-compose.yml

[ 추가 내용 ]

services:
  dbdbd:
    build:
# Docker image Build
# Docker Image를 Build하려면 Dockerfile 필요
      context: .
# Dockerfile 경로 지정 : 현재(.) 디렉토리
      dockerfile: Dockerfile
# 도커파일 이름 지정

# 들여쓰기 주의 ❗ 빌드의 하위 항목은 context와 dockerfile 밖에 없음
    image: mydb:1
# build해서 나온 이미지의 이름
    ports:
    - '33306:3306'
2. Dockerfile 생성
# 현재 디렉토리에 생성
root@host:/compose/build# vi Dockerfile

[ 추가 내용 ]
FROM mysql:8
ENV MYSQL_DATABASE=wpdb
ENV MYSQL_USER=wpuser
ENV MYSQL_PASSWORD=1234
ENV MYSQL_ROOT_PASSWORD=1234
3. docekr-compose 빌드&실행
root@host:/compose/build# docker compose up -d
[+] Running 1/1
 ! dbdbd Warning pull access denied for myd...                3.8s
Compose now can delegate build to bake for better performances
Just set COMPOSE_BAKE=true
[+] Building 0.1s (6/6) FINISHED                    docker:default
 => [dbdbd internal] load build definition from Dockerfile    0.0s
 => => transferring dockerfile: 150B                          0.0s
 => WARN: SecretsUsedInArgOrEnv: Do not use ARG or ENV instr  0.0s
 => WARN: SecretsUsedInArgOrEnv: Do not use ARG or ENV instr  0.0s
 => [dbdbd internal] load metadata for docker.io/library/mys  0.0s
 => [dbdbd internal] load .dockerignore                       0.0s
 => => transferring context: 2B                               0.0s
 => CACHED [dbdbd 1/1] FROM docker.io/library/mysql:8         0.0s
 => [dbdbd] exporting to image                                0.0s
 => => exporting layers                                       0.0s
 => => writing image sha256:8f06a04f5580480e66844574c9f891f4  0.0s
 => => naming to docker.io/library/mydb:1                     0.0s
 => [dbdbd] resolving provenance for metadata file            0.0s
[+] Running 3/3
 ✔ dbdbd                    Built                             0.0s
 ✔ Network build_default    Create...                         0.0s
 ✔ Container build-dbdbd-1  Star...                           0.2s
4. docekr compose 생성 확인
root@host:/compose/build# docker compose ps
NAME            IMAGE     COMMAND                  SERVICE   CREATED          STATUS          PORTS
build-dbdbd-1   mydb:1    "docker-entrypoint.s…"   dbdbd     44 seconds ago   Up 43 seconds   33060/tcp, 0.0.0.0:33306->3306/tcp, [::]:33306->3306/tcp
5. DB 컨테이너 접속 확인
root@host:/compose/build# mysql -u wpuser -p1234 -h 211.183.3.100 -P 33306
mysql: [Warning] Using a password on the command line interface can be insecure.
Welcome to the MySQL monitor.  Commands end with ; or \g.
Your MySQL connection id is 8
Server version: 8.4.4 MySQL Community Server - GPL

Copyright (c) 2000, 2025, Oracle and/or its affiliates.

Oracle is a registered trademark of Oracle Corporation and/or its
affiliates. Other names may be trademarks of their respective
owners.

Type 'help;' or '\h' for help. Type '\c' to clear the current input statement.

mysql>
⚠️ Dockerfile 수정 후, 적용 안 되는 경우 ➡️ --build로 적용시키기
- 암호 업데이트❌ ➡️ 이미지 빌드 ❌
👉 이미지가 이미 존재하면 빌드를 하지 않음
root@host:/compose/build# docker compose down
[+] Running 2/2
 ✔ Container build-dbdbd-1  Remo...                           1.0s
 ✔ Network build_default    Remove...                         0.1s

root@host:/compose/build# vi Dockerfile

FROM mysql:8
ENV MYSQL_DATABASE=wpdb
ENV MYSQL_USER=wpuser
ENV MYSQL_PASSWORD=12345
ENV MYSQL_ROOT_PASSWORD=1234

root@host:/compose/build# docker compose up -d
[+] Running 2/2
 ✔ Network build_default    Create...                         0.0s


root@host:/compose/build# mysql -u wpuser -p12345 -h 211.183.3.100 -P 33306
mysql: [Warning] Using a password on the command line interface can be insecure.
ERROR 1045 (28000): Access denied for user 'wpuser'@'211.183.3.100' (using password: YES)
해결 방법
# --build : 항상 빌드
root@host:/compose/build# docker compose up -d --build
Compose now can delegate build to bake for better performances
Just set COMPOSE_BAKE=true
[+] Building 0.0s (6/6) FINISHED                    docker:default
 => [dbdbd internal] load build definition from Dockerfile    0.0s
 => => transferring dockerfile: 151B                          0.0s
 => WARN: SecretsUsedInArgOrEnv: Do not use ARG or ENV instr  0.0s
 => WARN: SecretsUsedInArgOrEnv: Do not use ARG or ENV instr  0.0s
 => [dbdbd internal] load metadata for docker.io/library/mys  0.0s
 => [dbdbd internal] load .dockerignore                       0.0s
 => => transferring context: 2B                               0.0s
 => CACHED [dbdbd 1/1] FROM docker.io/library/mysql:8         0.0s
 => [dbdbd] exporting to image                                0.0s
 => => exporting layers                                       0.0s
 => => writing image sha256:0cf32f2d6ddb82d4b606c8764464790f  0.0s
 => => naming to docker.io/library/mydb:1                     0.0s
 => [dbdbd] resolving provenance for metadata file            0.0s
[+] Running 3/3
 ✔ dbdbd                    Built                             0.0s
 ✔ Network build_default    Create...                         0.0s
 ✔ Container build-dbdbd-1  Star...                           0.2s

root@host:/compose/build# mysql -u wpuser -p12345 -h 211.183.3.100 -P 33306
mysql: [Warning] Using a password on the command line interface can be insecure.
Welcome to the MySQL monitor.  Commands end with ; or \g.
Your MySQL connection id is 8
Server version: 8.4.4 MySQL Community Server - GPL

Copyright (c) 2000, 2025, Oracle and/or its affiliates.

Oracle is a registered trademark of Oracle Corporation and/or its
affiliates. Other names may be trademarks of their respective
owners.

Type 'help;' or '\h' for help. Type '\c' to clear the current input statement.

mysql>
Docker Compose Scaling
1.
# --scale <서비스이름>=<컨테이너 수>
root@host:/compose/build# docker compose up --scale dbdbd=3
[+] Running 3/3
 ✔ Container build-dbdbd-1  Runn...                           0.0s
 ✔ Container build-dbdbd-3  Crea...                           0.0s
 ✔ Container build-dbdbd-2  Crea...                           0.0s
Attaching to dbdbd-1, dbdbd-2, dbdbd-3
Error response from daemon: failed to set up container networking: driver failed programming external connectivity on endpoint build-dbdbd-3 (cfc33cb1c0a8043928c9f8b9bd41df89c86a646d4664c8f9760b189a2716f0d6): Bind for 0.0.0.0:33306 failed: port is already allocated
2.
root@host:/compose/build# vi docker-compose.yml

services:
  dbdbd:
    build:
# Docker image Build
# Docker Image를 Build하려면 Dockerfile 필요
      context: .
# Dockerfile 경로 지정 : 현재(.) 디렉토리
      dockerfile: Dockerfile
# 도커파일 이름 지정
    image: mydb:1
# build해서 나온 이미지의 이름
    ports:
    - '33306-33366:3306'
실습 - 03
문제
https://docs.docker.com/compose/gettingstarted/
위 예제를 통해 web-redis 컨테이너를 컴포즈파일로 만들어보세요.
풀이
1. Flas App 파일 생성
root@host:/compose/redis# vi app.py

import time

import redis
from flask import Flask

app = Flask(__name__)
cache = redis.Redis(host='redis', port=6379)

def get_hit_count():
    retries = 5
    while True:
        try:
            return cache.incr('hits')
        except redis.exceptions.ConnectionError as exc:
            if retries == 0:
                raise exc
            retries -= 1
            time.sleep(0.5)

@app.route('/')
def hello():
    count = get_hit_count()
    return f'Hello World! I have been seen {count} times.\n'
2. Flask 의존성 파일 생성
root@host:/compose/redis# vi requirements.txt

flask
redis
3. docker-compose.yml 파일 생성
root@host:/compose/redis# vi docker-compose.yml

services:
  web:
    build: .
    ports:
      - "8000:5000"
  redis:
    image: "redis:alpine"
4. Dockerfile 생성
root@host:/compose/redis# vi Dockerfile

# syntax=docker/dockerfile:1
FROM python:3.10-alpine
WORKDIR /code
ENV FLASK_APP=app.py
ENV FLASK_RUN_HOST=0.0.0.0
RUN apk add --no-cache gcc musl-dev linux-headers
COPY requirements.txt requirements.txt
RUN pip install -r requirements.txt
EXPOSE 5000
COPY . .
CMD ["flask", "run", "--debug"]
5. docker compose 생성
root@host:/compose/redis# docker compose up -d
6. 결과 확인

7. docker-compose.yml 수정 - compose watch 사용하도록 수정
root@host:/compose/redis# vi docker-compose.yml

services:
  web:
    build: .
    ports:
      - "8000:5000"
    develop:
      watch:
        - action: sync
          path: .
          target: /code
  redis:
    image: "redis:alpine"
8. docker compose watch 빌드&실행
- docker compose watch : 파일 감시 모드
root@host:/compose/redis# docker compose watch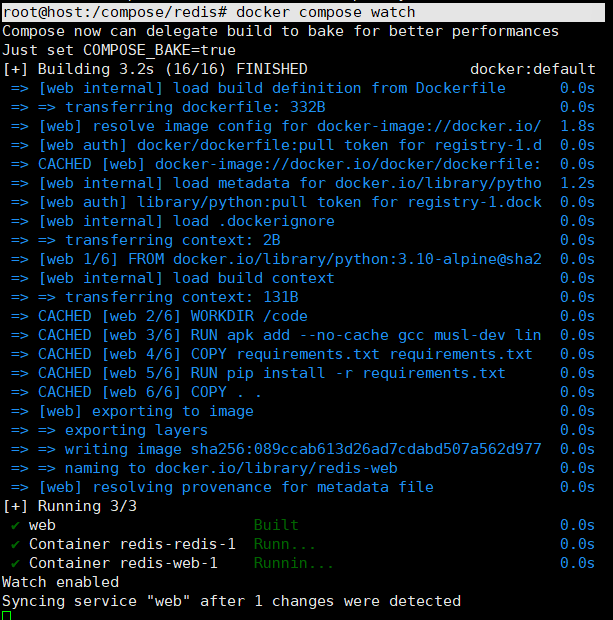
9. 애플리케이션 업데이트
root@host:/compose/redis# vi app.py

import time

import redis
from flask import Flask

app = Flask(__name__)
cache = redis.Redis(host='redis', port=6379)

def get_hit_count():
    retries = 5
    while True:
        try:
            return cache.incr('hits')
        except redis.exceptions.ConnectionError as exc:
            if retries == 0:
                raise exc
            retries -= 1
            time.sleep(0.5)

@app.route('/')
def hello():
    count = get_hit_count()
    return f'Hello from Docker! I have been seen {count} times.\n'
- 빌드를 다시 하지 않아도 업데이트가

10. 서비스 분할
- infra.yml
root@host:/compose/redis# vi infra.yml

services:
  redis:
image: "redis:alpine"- docker-compose.yml
root@host:/compose/redis# vi docker-compose.yml

include:
  - infra.yml
services:
  web:
    build: .
    ports:
      - "8000:5000"
    develop:
      watch:
        - action: sync
          path: .
          target: /code
➕ Scale 적용
root@host:/compose/redis# docker compose up -d --scale web=3
[+] Running 5/5
 ✔ Network redis_default    Created                     0.0s
 ✔ Container redis-web-3    Started                     0.5s
 ✔ Container redis-redis-1  Started                     0.3s
 ✔ Container redis-web-1    Started                     0.8s
 ✔ Container redis-web-2    Started                     0.3s
root@host:/compose/redis# docker compose ps
NAME            IMAGE          COMMAND                  SERVICE   CREATED         STATUS         PORTS
redis-redis-1   redis:alpine   "docker-entrypoint.s…"   redis     5 seconds ago   Up 5 seconds   6379/tcp
redis-web-1     redis-web      "flask run --debug"      web       5 seconds ago   Up 5 seconds   0.0.0.0:8000->5000/tcp, [::]:8000->5000/tcp
redis-web-2     redis-web      "flask run --debug"      web       5 seconds ago   Up 5 seconds   0.0.0.0:8002->5000/tcp, [::]:8002->5000/tcp
redis-web-3 redis-web "flask run --debug" web 5 seconds ago Up 5 seconds 0.0.0.0:8003->5000/tcp, [::]:8003->5000/tcp- 포트 늘려주기
root@host:/compose/redis# vi docker-compose.yml

include:
  - infra.yml
services:
  web:
    build: .
    ports:
      - "8000-8003:5000"
    develop:
      watch:
        - action: sync
          path: .
target: /code- 결과 확인


실습 - 04
문제
지난 시간에 했던 vuejs-fastapi 앱을 docker compose로 구성해 보세요.
풀이
1. docker-compose.yml 파일 생성
root@host:/compose/vue-fast/vue-fastapi# ls
backend  docker-compose.yml  frontend
root@host:/compose/vue-fast/vue-fastapi# vi docker-compose.yml

[내용 추가]
services:
  frontend:
    build:
      context: ./frontend/
      dockerfile: Dockerfile
    ports:
    - '85-88:80'
  backend:
    build:
      context: ./backend/
      dockerfile: Dockerfile
    ports:
    - '8000-8005:8000'
2. docker copmose 빌드 & 실행
root@host:/compose/vue-fast/vue-fastapi# docker compose up -d
[+] Running 3/3
 ✔ Network vue-fastapi_default       Create...                               0.0s
 ✔ Container vue-fastapi-backend-1   St...                                   0.3s
 ✔ Container vue-fastapi-frontend-1  S...                                    0.2s
3. 결과 확인

실습 - 05
문제
아래와 같은 디렉터리를 전제로,
web은 nginx, was는 tomcat, db는 mysql:8로 3 tier를 구성하는 도커 컴포즈 파일을 작성하세요.
[디렉터리 구조]
root@host:/compose# mkdir 3tier root@host:/compose# cd 3tier root@host:/compose/3tier# mkdir web was db root@host:/compose/3tier# tree . ├── db ├── was └── web 3 directories, 0 files
풀이
1. 파일 경로 생성
root@host:/compose/3tier# tree
.
├── db
│   └── Dockerfile
├── docker-compose.yml
├── was
│   ├── Dockerfile
│   ├── index.jsp
│   └── mysql-connector-java-8.0.23.jar
└── web
    ├── default.conf
    ├── Dockerfile
    └── index.html

3 directories, 8 files
2. DB의 Dockerfile 생성
root@host:/compose/3tier/db# vi Dockerfile

FROM mysql:8
ENV MYSQL_ROOT_PASSWORD=1234
ENV MYSQL_PASSWORD=1234
ENV MYSQL_USER=tomuser
ENV MYSQL_DATABASE=tomdb
3. WAS
- index.jsp
root@host:/compose/3tier/was# vi index.jsp

[내용 추가]

<%@ page language="java" contentType="text/html; charset=UTF-8" pageEncoding="UTF-8"%>
<%@ page import="java.sql.*"%>
<h1>DB</h2>
<%
        Connection conn=null;
        try{
                String Url="jdbc:mysql://db/tomdb";
                String Id="tomuser";
                String Pass="1234";

                Class.forName("com.mysql.jdbc.Driver");
                conn=DriverManager.getConnection(Url,Id,Pass);
                out.println("was-db Connection Success!");
        }catch(Exception e) {
                e.printStackTrace();
}
%>- mysql connector 다운로드
root@host:/compose/3tier/was# get https://repo1.maven.org/maven2/mysql/mysql-connector-java/8.0.23/mysql-connector-java-8.0.23.jar- Dockerfile 생성
root@host:/compose/3tier/was# vi Dockerfile

FROM tomcat:latest
WORKDIR /usr/local/tomcat
RUN mkdir /usr/local/tomcat/webapps/ROOT
COPY index.jsp ./webapps/ROOT/index.jsp
COPY mysql* /usr/local/tomcat/lib
4. WEB
- reverse proxy 설정
root@host:/compose/3tier/web# vi default.conf

server {

    location /jsp {
        proxy_pass http://was:8080/;
    }

}- Dockerfile 생성
root@host:/compose/3tier/web# vi Dockerfile

FROM nginx:latest
WORKDIR /usr/share/nginx/html
COPY . .
WORKDIR /etc/nginx/conf.d/
COPY default.conf default.conf
5. WEB
root@host:/compose/3tier# vi docker-compose.yml

services:
  web:
    build:
      context: ./web/
    ports:
    - '88:80'
    depends_on:
    - was
  was:
    build:
      context: ./was/
    depends_on:
    - db
  db:
    build:
      context: ./db/
6. 결과 확인

자율과제
문제
todo/weather/chat 이것도 한번 docker compose로 만들어보세요.
몽고디비에 저장되는 데이터를 호스트의 ./mongo에 저장시켜 보세요.(volume 사용)
풀이
To Be Continue...😂
'CS > Docker' 카테고리의 다른 글
| [Docker] 07. Docker Swarm (0) | 2025.03.25 |
|---|---|
| [Docker] 05. Multi-Stage Build(멀티 스테이지 빌드) (0) | 2025.03.24 |
| [Docker] 04. App 배포 - Java & NodeJS & Python (0) | 2025.03.20 |
| [Docker]03. Container Registry (0) | 2025.03.20 |
| [Docker]02. Docker Image - Dockerfile 명령어 (1) | 2025.03.18 |


