
| 일 | 월 | 화 | 수 | 목 | 금 | 토 |
|---|---|---|---|---|---|---|
| 1 | 2 | 3 | 4 | 5 | ||
| 6 | 7 | 8 | 9 | 10 | 11 | 12 |
| 13 | 14 | 15 | 16 | 17 | 18 | 19 |
| 20 | 21 | 22 | 23 | 24 | 25 | 26 |
| 27 | 28 | 29 | 30 |
- KUBECTL
- 쿠버네티스
- SAA-C03
- AWS 자격증
- aws saa
- Troubleshooting
- load balancer
- EC2 인스턴스
- aws cloud shcool 8
- linux
- Ebs
- NAT
- docker
- GNS3
- aws cloud
- DNS
- AWS
- vmware
- ALB
- aws cloud school
- FTP
- 네트워크
- aws SAA-c03
- Firewall
- IAM
- Kubernetes
- tftp
- EC2
- vyos
- aws iam
- Today
- Total
나의 공부기록
[VMware] 04. 정적 웹 서버 - template 적용 & 실습 본문
정적 웹 서버
[ template 적용 방법 ]
1. Google ➡️ free template 검색
Free CSS | 3552 Free Website Templates, CSS Templates and Open Source Templates
What's On Offer Free CSS Templates Why not download 3552 free website templates. All of the templates have been built using CSS & HTML or XHTML Premium CSS Templates If you can't find a free CSS website template that suits your needs, then why not take a l
www.free-css.com
2. 원하는 template 링크 복사
- 원하는 template 선택 ➡️ DOWNLOAD 버튼에서 우클릭으로 링크 주소 복사

3. wget 패키지로 설치
- wget : 웹(web)에서 다운로드(get)하는 명령어
[root@web ~]#yum install -y wget
➡️wget 패키지 설치
[root@web ~]#wget <링크>
➡️ 현재 위치한 곳에 다운로드됨
4. template 압축 해제
- unzip : zip 확장자 압축 해제를 위한 명령어
[root@web ~]#yum install -y unzip
➡️unzip 패키지 설치
[root@web ~]#unzip <zip파일>
➡️ <zip> 파일 압축해제
5. template을 웹 서버 최상위 디렉토리로 이동
[root@web ~]#cp -r <폴더명> <복사할 경로>
[root@web ~]#cp -r oxer-html /var/www/html
➡️oxer-html 파일을 /var/www/html 밑에 복사
➡️ -r : 하위 파일이 존재하면, 하위 파일의 내용까지 복
6. 웹 접속 확인
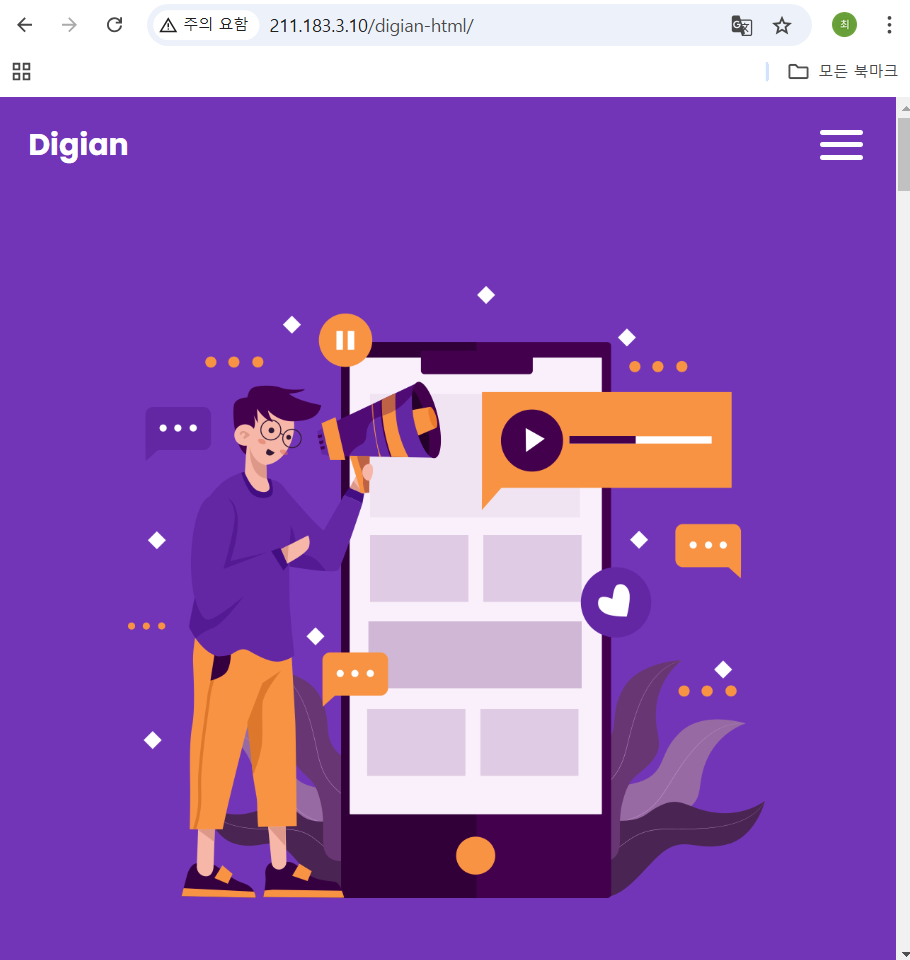
- http://211.183.3.80/exer-html/ 접속
= http://211.183.3.80/exer-html/index.html
💡httpd://211.183.3.80/exer-html/로 접속하면 디렉토리인데, 어떻게 html을 띄워주는 건가?
➡️httpd 설정에서 파일을 명시하지 않으면 index.html(default)를 띄우는 것으로 설정했기 때문에
✅웹 루트 디렉토리의 기능적인 부분 수정 방법
1. 웹 루트 디렉토리의 밑에 zip 파일 해제
2. httpd conf 파일 수정
[root@web ~]#vi /etc/httpd/conf/httpd.conf
➡️httpd 내용에서 RootDirectory 설정 수정
➡️DocumentRoot : /var/www/html/sub/ 수정
🌟기능적인 부분의 수정이면 httpd 재시작 필수
3. 웹 브라우저 접속 ➡️ http://211.183.3.80 = http://211.183.3.80/sub/index.html
💡shell에서 파란색으로 표시된 것은 폴더 / 하얀색은 파일
🌟🌟실습🌟🌟
문제) 아래의 그림을 보고, R1의 f0/1에 설정된 주소로 접속 시, 아무 템플릿이나 보이도록 해보세요. (with.GNS)

풀이)
1. 토폴로지 구성
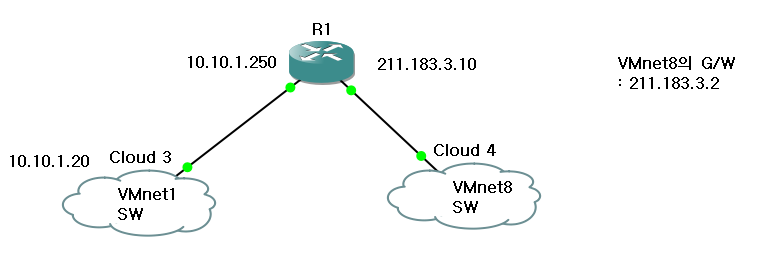
2. VMnet1의 WEB SERVER 생성

➡️ G/W가 R1의 f0/1로 설정해야 하는 이유
👉 VMnet1은 host-only이고 외부랑 통신하기 위해서는 f0/0으로 빠져나가야 하기 때문
👉 G/W 설정할 때는 토폴로지의 구조를 보고 정하기(무조건 G/W는 x.x.x.2 ❌)
3. R1 라우터 설정
- int f0/0 : ip add 10.10.1.250 255.255.255.0
- int f0/1 : ip add 211.183.3.10 255.255.255.0
4. R1의 PAT & DNAT 설정
- PAT 설정
1. Source(출발지) 정의 - ACL
Router(config)#access-list 1 per 10.10.1.0 255.255.255.0
2. 내/외부 설정
Router(config)#int f0/0
Router(config-if)#ip nat inside
Router(config-if)#int f0/1
Router(config-if)#ip nat outside
3. NAT 명령어
Router(config-if)#ip nat inside source list 1 int f0/1 overload
- PAT 설정 이유
- 패키지를 설정하기 위해 8.8.8.8과 통신이 되어야 하기 때문에
- 내부 ➡️ 외부 IP - NAT 발생
- DNAT 설정
1. 내/외부 설정
Router(config)#int f0/0
Router(config-if)#ip nat inside
Router(config-if)#int f0/1
Router(config-if)#ip nat outside
2. DNAT 명령어
Router(config-if)#ip nat inside source static tcp 10.10.1.20 80 211.183.3.250 80
- DNAT 설정 이유
- 외부 ➡️ 내부의 웹 서버로 접근하기 위해서 특정 포트로 접근 가능하도록 하기 위해 설정
5. R1의 f0/1 - default route 설정
Router(config)#int f0/1
Router(config-if)#ip route 0.0.0.0 0.0.0.0 211.183.3.2
= ip route 192.168.1.0 0.0.0.255 211.183.3.2
➡️192.168.1.0/24 대역을 설정한 이유는 VMnet8이 외부와 통신을 하기 위해서는 호스트인 노트북의 대역으로 NAT가 발생하기 때문에, 192.168.1.0/24 대역으로 가기 위한 default-route는 211.183.3.2 임으로 호스트의 대역대로 설정 가능
✅ default-route 설정 이유
➡️ R1 입장에서는 VMnet8에서 외부를 나갈 수 있는 곳이 VMnet8의 G/W를 Next-hop으로 설정해 줘서 출구를 지정해줘야 한다.
➡️R1은 통신하고자 하는 IP(8.8.8.8)는 VMnet8의 대역인 211.183.3.0/24에 포함되지 않고 대역을 알지 못하기 때문에, 느슨한 네트워크인 0.0.0.0/32로 지정해야 한다.
6. 외부 통신 확인(R1에서)
Router(config)#do ping 8.8.8.8
➡️ 성공
7. VMnet1의 VM 웹 서버 설정
1) 방화벽 해제
[root@web ~]#systemctl stop firewall
[root@web ~]#systemctl disable firewalld
[root@web ~]#systemctl restart network
➡️ 반영
2) SELinux 설정 해제
[root@web ~]#getenforce → SELinux 상태 확인
[root@web ~]#vi /etc/selinux/config
➡️ SELINUX=disabled
[root@web ~]#reboot
3) 레포지토리 설정
[root@web ~]#vi /etc/yum.repos.d/CentOS-Base.repo
[root@web ~]#cat << EOF > /etc/yum.repos.d/CentOS-Base.repo
[root@web ~]#reboot
4) 패키지 설치(httpd, wget, unzip)
[root@web ~]#yum install -y httpd
➡️ 웹 서버 패키지 다운로드
[root@web ~]#systemctl restart httpd
➡️ httpd 서버 재시작
[root@web ~]#yum install -y weget
➡️template 파일 다운로드할 수 있는 패키지
[root@web ~]#yum install -y unzip
➡️zip파일 해제하는 패키지 다운로드
5) template 설정
[root@web ~]#wget https://www.free-css.com/assets/files/free-css-templates/download/page294/digian.zip
[root@web ~]#unzip oxer-html.zip [root@web ~]#cp -r oxer-html /var/www/html
[root@web ~]# curl 127.0.0.1
8. 웹 접속 확인
'CS > Linux' 카테고리의 다른 글
| [VMware] 07. NFS(Network File System) (1) | 2025.01.22 |
|---|---|
| [VMware] 06. DNS(Domain Name System) (0) | 2025.01.21 |
| [VMware]03. Xshell & SELinux & 정적 웹 서버 & GNS3 (0) | 2025.01.08 |
| [VMware] 02. 리눅스 명령어 & 패키지 & NAT 네트워크 간 VM 웹 서버 통신(Server - Client) (0) | 2025.01.08 |
| [VMware] 01. 가상 머신의 네트워크 연결 (0) | 2025.01.07 |


