
| 일 | 월 | 화 | 수 | 목 | 금 | 토 |
|---|---|---|---|---|---|---|
| 1 | 2 | 3 | 4 | 5 | ||
| 6 | 7 | 8 | 9 | 10 | 11 | 12 |
| 13 | 14 | 15 | 16 | 17 | 18 | 19 |
| 20 | 21 | 22 | 23 | 24 | 25 | 26 |
| 27 | 28 | 29 | 30 |
- Kubernetes
- Firewall
- aws cloud school
- FTP
- NAT
- aws saa
- EC2
- AWS
- aws cloud
- docker
- SAA-C03
- vyos
- tftp
- EC2 인스턴스
- aws SAA-c03
- Ebs
- vmware
- linux
- Troubleshooting
- aws cloud shcool 8
- aws iam
- DNS
- AWS 자격증
- 네트워크
- GNS3
- load balancer
- ALB
- IAM
- 쿠버네티스
- KUBECTL
- Today
- Total
나의 공부기록
[Kubernetes] 03. LoadBalancer & Ingress 본문
Kubernetes Service
LoadBalancer 타입

- 각 클러스터 관리자의 도움이 필요한 서비스 타입
- EKS 같은 클라우드 서비스 제공자의 경우, Service 타입을 LoadBalancer로 명시하기만 해도 이미 기능이 구현되어 있기 때문에, 자동으로 LoadBalancer(LB)가 생성됨
➡️ AWS의 EKS에서 Service 타입을 LoadBalancer로 생성하면 실제 NLB나 Classic LoadBalancer(=기본값)가 생성 - 근데, 우리는 온프레미스에 클러스터를 구축했기 때문에, 그 기능이 존재하지 않음
➡️ Bare-metal 환경에 직접 구축했기 때문에, metalLB라는 애드온을 추가하여 로드밸런생 기능을 구현해야 함
01. metalLB 설치 페이지
02. metalLB 다운로드
- 나중에 클러스터 재구축 시, 사용할 수 있으므로 wget으로 다운로
root@master-250410:~# wget https://raw.githubusercontent.com/metallb/metallb/v0.14.9/config/manifests/metallb-native.yaml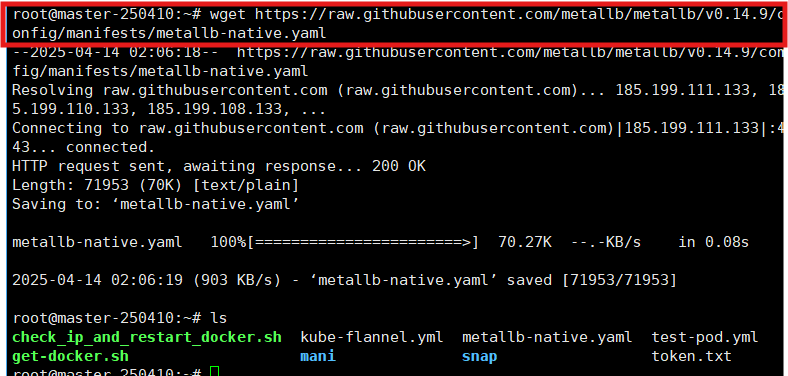
03. metallb 설치
root@master-250410:~# kubectl apply -f metallb-native.yaml- 설치된 네임스페이스 : metallb-system

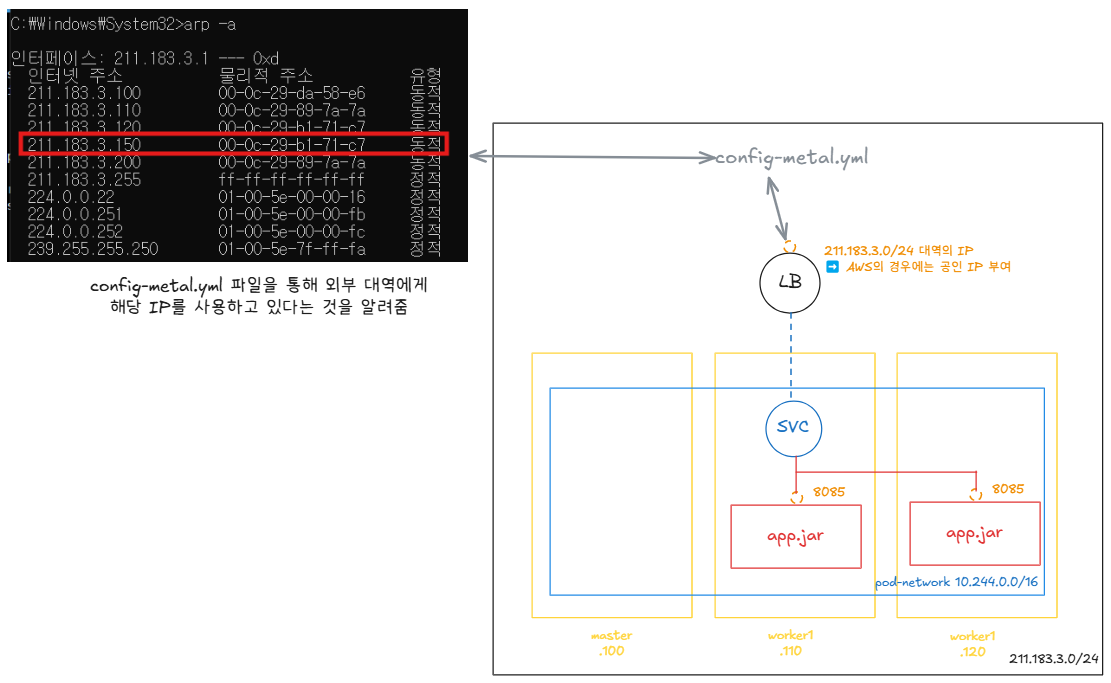
- speaker의 역할 = LB에 부여된 IP를 외부 대역에 알려주는 역할
- 서비스 타입을 LoadBalancer로 하여 LB를 생성하면, 211.183.3.0/24 대역의 IP를 갖는 리소스가 하나 생성됨
➡️ 실제 네트워크인 211.183.3.0/24대역의 입장에서는 가상의 리소스이며, 인지 불가능 - 이렇게 부여받은 IP는 211.183.3.0/24 네트워크 입장에서는 알 수 없음
➡️ LB에 부여된 IP를 집 외부(=211.183.3.0/24) 대역에 알려줘야 함 = Speaker의 역할
👉 Ex) LB를 생성해서 211.183.3.200이라는 IP를 부여할거니까 211.183.3.0/24대역도 그렇게 알아!
root@master-250410:~# kubectl get pod -n metallb-system
NAME                         READY   STATUS    RESTARTS   AGE
controller-7dcb87658-sj75c   1/1     Running   0          98s
speaker-5h4z5                1/1     Running   0          98s
speaker-vj8gn                1/1     Running   0          98s
speaker-zrvf9                1/1     Running   0          98s
04. config 파일 설정
- config 파일 참고 서식
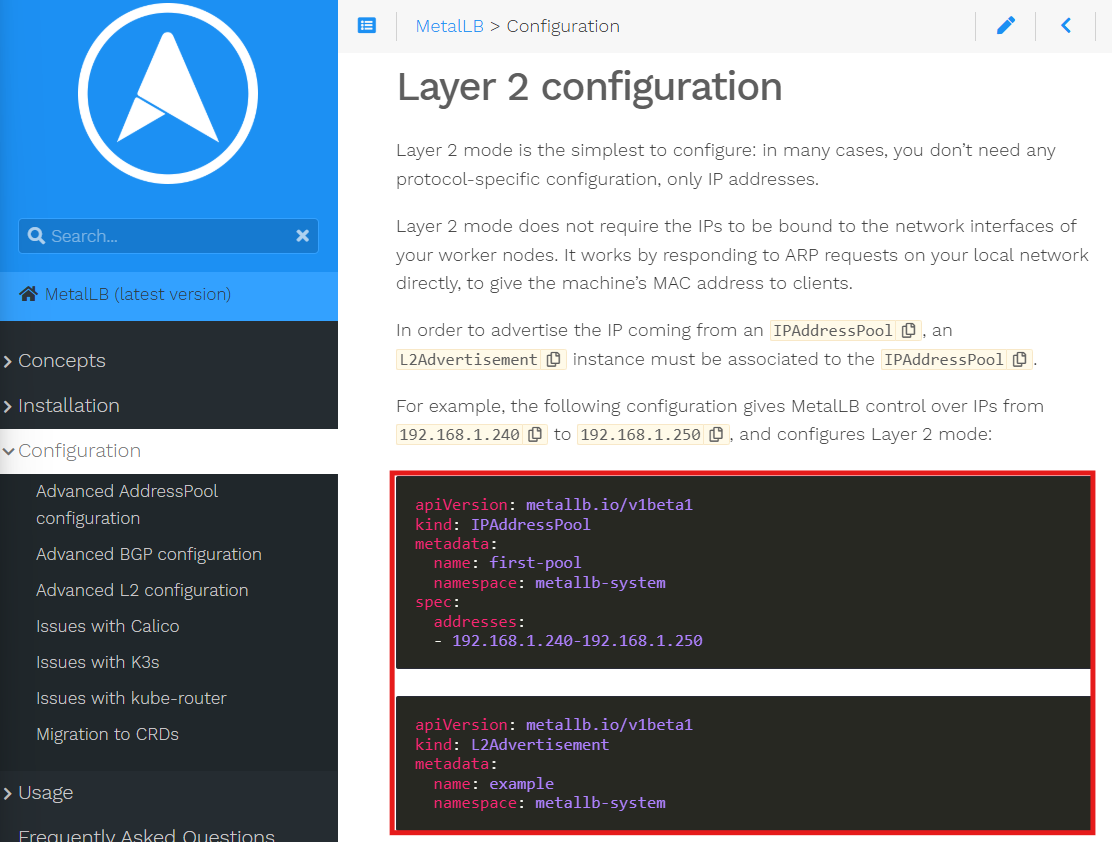
- IPAddressPool : LB를 생성했을 때, 부여받을 IP 대역 정의
- L2Advertisement : LB에 특정한 IP가 부여됐다는 사실을 다른 네트워크 구성원들에게 알려주는 역할(speaker라는 pod가 정상 동작)
root@master-250410:~/mani/250414# vi config-metal.yml

apiVersion: metallb.io/v1beta1
kind: IPAddressPool
metadata:
  name: first-pool
  namespace: metallb-system
spec:
  addresses:
  - 211.183.3.200-211.183.3.240 # 대역이 겹치지 않게 수정
---
apiVersion: metallb.io/v1beta1
kind: L2Advertisement
metadata:
  name: example
  namespace: metallb-system
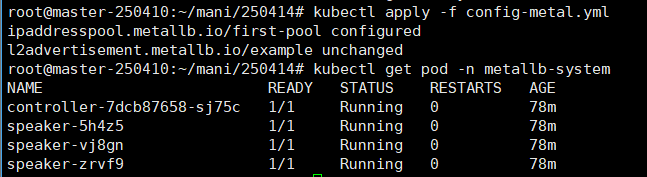
05. manifest file 반영 - config-metal 설정 파일 적용
root@master-250410:~/mani/250414# kubectl apply -f config-metal.yml
ipaddresspool.metallb.io/first-pool created
l2advertisement.metallb.io/example created
06. manifest file 생성 - LoadBalancer 생성
root@master-250410:~/mani# cp hw1.yml lbtest.yml
root@master-250410:~/mani# vi lbtest.yml

apiVersion: v1
kind: Namespace
metadata:
  name: ip-ns
---
apiVersion: apps/v1
kind: Deployment
metadata:
  name: ip-dep
  namespace: ip-ns
spec:
  replicas: 2
  selector:
    matchLabels:
      app: myipnginx
  template:
    metadata:
      labels:
        app: myipnginx
    spec:
      containers:
      - name: ip-con
        image: oolralra/ipnginx
---
apiVersion: v1
kind: Service
metadata:
  name: svc-ipnginx
  namespace: ip-ns
spec:
  selector:
    app: myipnginx
  type: LoadBalancer # ✅ edit : NodePort -> LoadBalancer
  ports:
  - port: 80 # ✅ edit : NodePort 삭제
    targetPort: 80

- ✅ config-metal.yml에서 정의한 IP대역에서 IP를 부여받았는지 확인

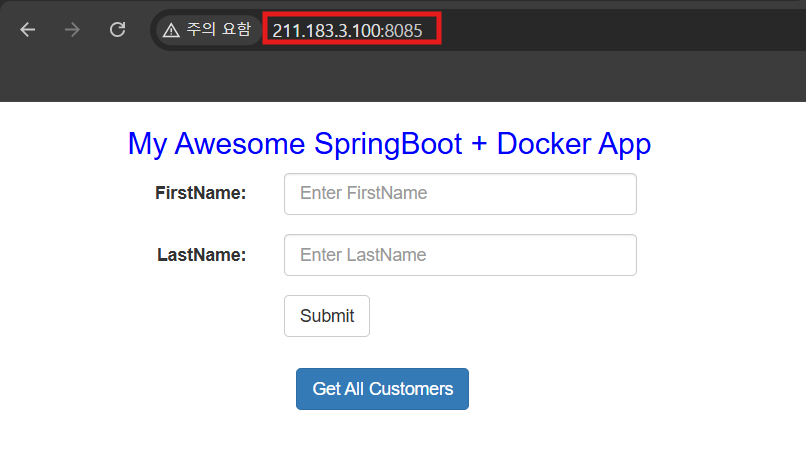
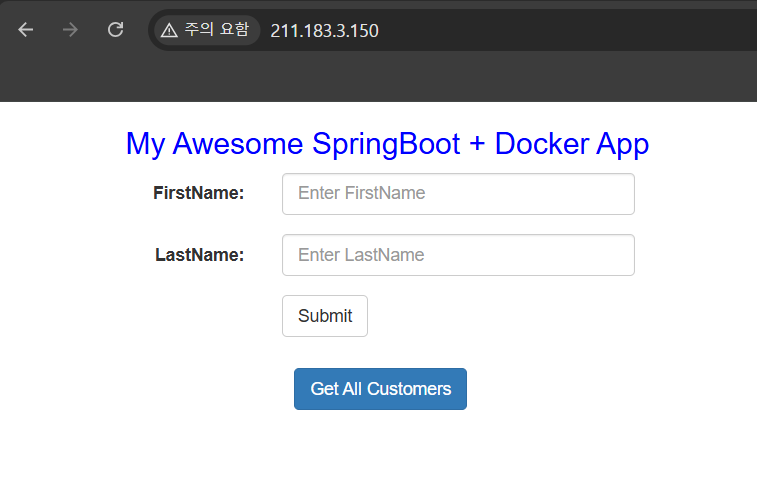
07. 외부 IP로 접속 가능 확인

실습 - 01
문제
https://github.com/oolralra/simple_jar #이미 빌드가 되어있는 springboot 앱.
8085 포트 사용
211.183.3.150~160정도의 IP로 접속했을 때, 위 앱이 뜨도록 한번 만들어보세요.
ns : spring-ns
svc: svc-spring
pod의 label => app: spring
컨테이너 레지스트리는 제꺼 써도 괜찮고 도커허브 쓰셔도 됩니다.
풀이
0. 소스코드 다운로드
root@master-250410:~/mani/250414/exam01# git clone https://github.com/oolralra/simple_jar.git
1. Dockerfile 생성
root@master-250410:~/mani/250414/exam01/simple_jar# vi Dockerfile

FROM openjdk:8-jre-alpine
WORKDIR /app
COPY ./springbootApp.jar /app/myapp.jar
CMD ["java","-jar","/app/myapp.jar"]
2. 이미지 빌드
- docker push 전에 테스트 용
root@master-250410:~/mani/250414/exam01/simple_jar# docker build -t etoile0320/simple:5 .
3. 이미지 실행
root@master-250410:~/mani/250414/exam01/simple_jar# docker run -dp 8085:8085 --name simple etoile0320/simple:5
4. 이미지 정상 확인
5. Docker Hub에 Push
5-1. docker 이미지 확인
root@master-250410:~/mani/250414/exam01/simple_jar# docker image ls
REPOSITORY             TAG       IMAGE ID       CREATED          SIZE
etoile0320/simple      5         55bd8f829758   3 minutes ago    106MB
etoile0320/simple      4         cced63971271   10 minutes ago   126MB
etoile0320/simple      3         bf59e2841f13   10 minutes ago   126MB
etoile0320/simple      2         162d882fecf2   16 minutes ago   526MB
etoile0320/simple      1         00c20af94bff   25 minutes ago   526MB
61.254.18.30:5000/bo   1         3b301fa6937e   3 days ago       47.9MB
etoile0320/mynginx     1         3b301fa6937e   3 days ago       47.9MB
mynginx                1         3b301fa6937e   3 days ago       47.9MB
oolralra/ipnginx       latest    788e26c8647a   5 years ago      127MB
5-2. 이미지 push
root@master-250410:~/mani/250414/exam01/simple_jar# docker tag etoile0320/simple:5 etoile0320/simple:1

root@master-250410:~/mani/250414/exam01/simple_jar# docker push etoile0320/simple:1
The push refers to repository [docker.io/etoile0320/simple]
53b5e98fd6f6: Pushed
c15fdb7a75f6: Pushed
edd61588d126: Mounted from library/openjdk
9b9b7f3d56a0: Mounted from library/openjdk
f1b5933fe4b5: Mounted from library/openjdk
1: digest: sha256:aa75b8aa3f804d6bde66e4ef6d7016b7713f14616dc809a8d84bab6241ece005 size: 1366
5-3. Docker Hub에 업로드된 이미지 확인

6. LB 대역 설정
6-1. config-metal.yml 수정
root@master-250410:~/mani/250414# vi config-metal.yml

apiVersion: metallb.io/v1beta1
kind: IPAddressPool
metadata:
  name: first-pool
  namespace: metallb-system
spec:
  addresses:
  - 211.183.3.150-211.183.3.160 # 대역이 겹치지 않게 수정
---
apiVersion: metallb.io/v1beta1
kind: L2Advertisement
metadata:
  name: example
  namespace: metallb-system
6-2. config-metal.yml 반영
7. manifest file 수정
- targetPort를 실제 앱이 동작하는 포트인 8085로 해주는 것이 제일 중요❗
- LB를 생성하면 service의 포트(port)인 80을 따라감
root@master-250410:~/mani/250414/exam01# vi lb.yml

apiVersion: v1
kind: Namespace
metadata:
  name: spring-ns
---
apiVersion: apps/v1
kind: Deployment
metadata:
  name: spring-dep
  namespace: spring-ns
spec:
  replicas: 2
  selector:
    matchLabels:
      app: spring
  template:
    metadata:
      labels:
        app: spring
    spec:
      containers:
      - name: spring-con
        image: etoile0320/simple:1
---
apiVersion: v1
kind: Service
metadata:
  name: svc-spring
  namespace: spring-ns
spec:
  selector:
    app: spring
  type: LoadBalancer
  ports:
  - port: 80
    targetPort: 8085 # 포트 번호 주의❗
8. manifest file 반영 - LoadBalancer, Service, Namespace, Pod 등... 생성
root@master-250410:~/mani/250414/exam01# kubectl apply -f lb.yml
namespace/spring-ns created
deployment.apps/spring-dep created
service/svc-spring created
9. LB - 외부 대역 IP 부여 확인
root@master-250410:~/mani/250414/exam01# kubectl get svc -n spring-ns
NAME         TYPE           CLUSTER-IP       EXTERNAL-IP     PORT(S)        AGE
svc-spring LoadBalancer 10.107.204.149 211.183.3.150 80:32458/TCP 13s- Pod 정상 작동 확인

10. LB 접속 확인
✅ 실습 정리
- 쿠버네티스 클러스터에서 Advertisement를 통해 적극적으로 metalLB가 쓰는 IP를 알려줬기 때문에
➡️ 다른 노트북이나 네트워크 구성원들이 IP를 인지할 수 있음
ExternalName 서비스
- 생략 ➡️ 호스트네임을 다루지는 않을거라 따로 정리❌
➕ 모놀리식(Monolithic) VS 마이크로서비스(Micro-Service)

- 여러 개의 컨테이너에 각 기능들을 구현하여 path로 라우팅이 가능해야 함
- 일반적인 svc로는 path기반 라우팅이 불가능
➡️ path 기반 라우팅을 지원하는 것이 Ingress 서비스 - 프로그램 언어를 나누어도 동일한 DB를 사용 ➡️ Micro-Service라고 할 수 없

- 위의 내용처럼 개념과 공부 흐름을 알고 있어야 함
- 현재는 컨테이너 가상화를 공부하고 있으며, Kubernetes는 컨테이너 가상화임
🌟Ingress - path 기반 라우팅이 가능한 리소스

- 만약 위 마이크로 서비스를 일반적인 Load Balancer로 구현한다고 하면, 위와 같은 한계가 발생
➡️ 서비스는 한 종류의 label만 품을 수 있기 때문에

- 여러 개의 서비스를 하나로 품을 수 있는 무언가 = Ingress
➡️ Ingress Controller가 필요❗ - 되도록이면 Ingress Controller를 설치할 때, metalLB를 먼저 구성해 주는 것이 좋음
1. Ingress Controller 설치
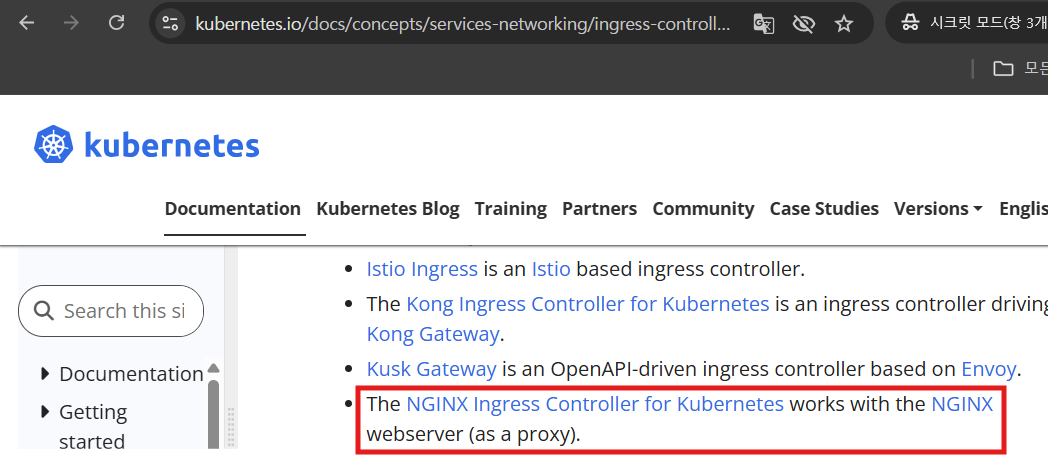
- nginx를 통해 사용할 예정
- 버전이 계속 변경되는 ingress-controller 설치 페이지
1-1. ingress-controller 배포 경로 다운로드
root@master-250410:~/mani/ingress# wget https://raw.githubusercontent.com/kubernetes/ingress-nginx/controller-v1.12.1/deploy/static/provider/baremetal/deploy.yaml
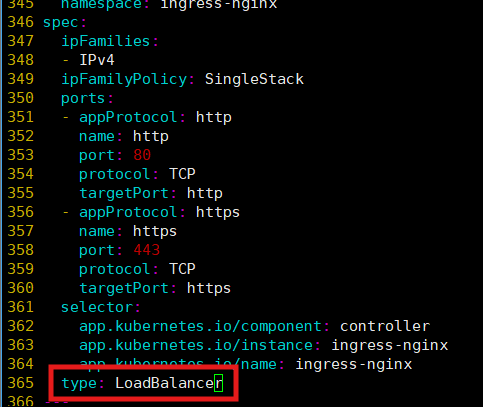
1-2. ingress-controller 매니페스트 파일 수정
root@master-250410:~/mani/ingress# vi deploy.yaml

365   type: LoadBalancer # NodePort ➡️ LoadBalancer 수정
1-3. Ingress-Controller 설치
- ingress-nginx라는 네임스페이스에 기능이 설치됨
root@master-250410:~/mani/ingress# kubectl apply -f deploy.yaml
1-4. Ingress-Controller 설치 확인
root@master-250410:~/mani/ingress# kubectl get pod -n ingress-nginx
NAME                                        READY   STATUS      RESTARTS   AGE
ingress-nginx-admission-create-bk9fz        0/1     Completed   0          89s
ingress-nginx-admission-patch-d7wtb         0/1     Completed   0          89s
ingress-nginx-controller-59f798c8dd-hg4q7   1/1     Running     0          89s
# ✅controller만 1/1(정상)이면 됨
1-5. Ingress-Controller 접속 주소 확인
- Ingress-Controller의 Service 타입을 LoadBalancer로 했기 때문에 IP를 하나 부여받아야 함

2. headless 서비스 생성
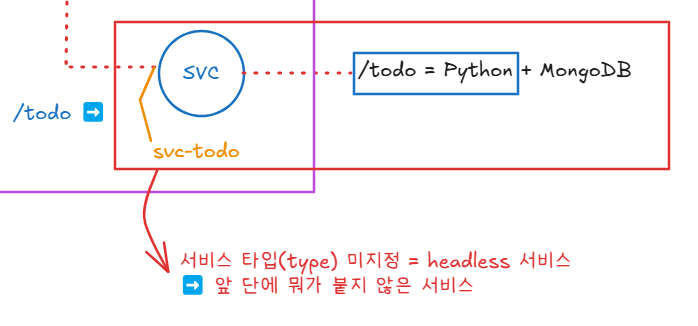
2-1. headless 서비스의 manifest file 생성
- ❗나중에 ingress를 구성할 때, 서비스의 이름으로 찾아갈 것이기 때문에, svc의 이름(svc-ip)을 기억해야 함
root@master-250410:~/mani/ingress# vi ip.yml

apiVersion: v1
kind: Service
metadata:
  name: svc-ip
spec:
  selector:
    app: ipnginx
  ports:
  - port: 80
    targetPort: 80
---
apiVersion: apps/v1
kind: Deployment
metadata:
  name: ip-dep
spec:
  replicas: 3
  selector:
    matchLabels:
      app: ipnginx
  template:
    metadata:
      name: ip-pod
      labels:
        app: ipnginx
    spec:
      containers:
      - name: ip-con
        image: 61.254.18.30:5000/ipnginx
2-2. headless 서비스 반영(apply)
root@master-250410:~/mani/ingress# kubectl apply -f ip.yml
service/svc-ip created
deployment.apps/ip-dep created
2-3. 서비스 작동 확인 - ENDPoint에 Pod가 존재하는 것을 확인
root@master-250410:~/mani/ingress# kubectl describe svc svc-ip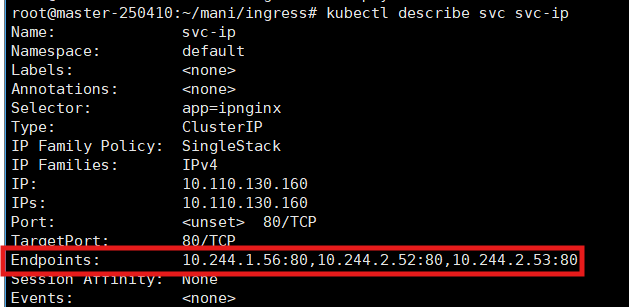
2-4. Pod 정상 작동 확인
- Service와 Pod에 문제없는 것을 확인
➡️ Ingress에 문제가 발생해서 트러블슈팅할 때, 용
request_method : GET | ip_dest: 10.244.1.56
root@master-250410:~/mani/ingress# clear
root@master-250410:~/mani/ingress# kubectl get svc
NAME         TYPE        CLUSTER-IP       EXTERNAL-IP   PORT(S)   AGE
kubernetes   ClusterIP   10.96.0.1        <none>        443/TCP   4d4h
svc-ip       ClusterIP   10.110.130.160   <none>        80/TCP    7m7s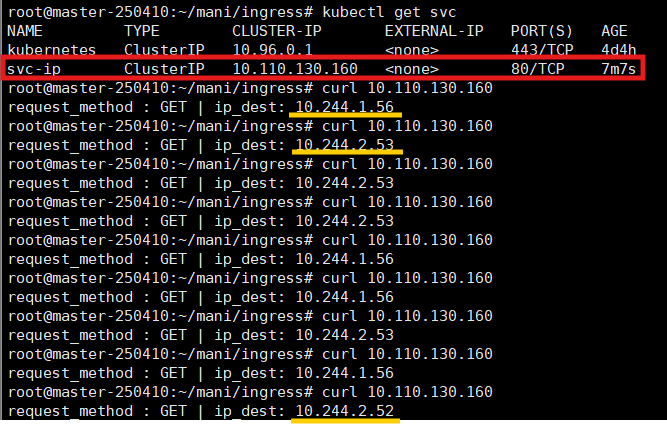
3. Ingress 생성
3-1. Ingress의 manifest file 생성
- annotations : 추가적인 정보 ➡️ Labels와 비슷하지만 주로 부가적인 기능 명시
- ingress controller ➡️ nginx
- rewrite-target: /
➡️ path(/httpd) 통해서 해당 앱으로 접근하면 경로를 '/httpd'이 아닌 '/'로 가겠다. - host ➡️ 영문 주소 / DNS 기능 필요
- path: /httpd ➡️ host와 조합하여 rapa.com/httpd로 들어왔을 때를 의미
- backend: ➡️ Service를 의미
- service
- name: svc-ip ➡️ 연결시켜줄 Service 이름
- port
- number: 80 ➡️ 연결시켜줄 Service 포
- service
root@master-250410:~/mani/ingress# vi ingress.yml

apiVersion: networking.k8s.io/v1
kind: Ingress
metadata:
  name: ingress
  annotations:
    kubernetes.io/ingress.class: "nginx"
    nginx.ingress.kubernetes.io/rewrite-target: /
spec:
  rules:
    - host: rapa.com
      http:
        paths:
          - path: /httpd
            pathType: Prefix
            backend:
              service:
                name: svc-ip #서비스의 이름
                port:
                  number: 80 #서비스의 포트
3-2. Ingress의 manifest file 적용
root@master-250410:~/mani/ingress# kubectl apply -f ingress.yml
Warning: annotation "kubernetes.io/ingress.class" is deprecated, please use 'spec.ingressClassName' instead
ingress.networking.k8s.io/ingress created
3-3. Ingress 반영 확인

3-4. 작은 DNS 설정
- DNS-Server를 구성하긴 그러니까, rapa.com을 안내해주기 위해 /etc/hosts에 적어줌
root@master-250410:~/mani/ingress# vi /etc/hosts

127.0.0.1 localhost
127.0.1.1 ubuntu-tem

# ✅ kubectl get svc -n ingress-nginx에서 나왔던 주소
# ingress-controller 주소
211.183.3.151 rapa.com
4. ingress - svc - pod 구성 확인
- rapa.com 주소가 211.183.3.151로 매칭이 되어 있으므
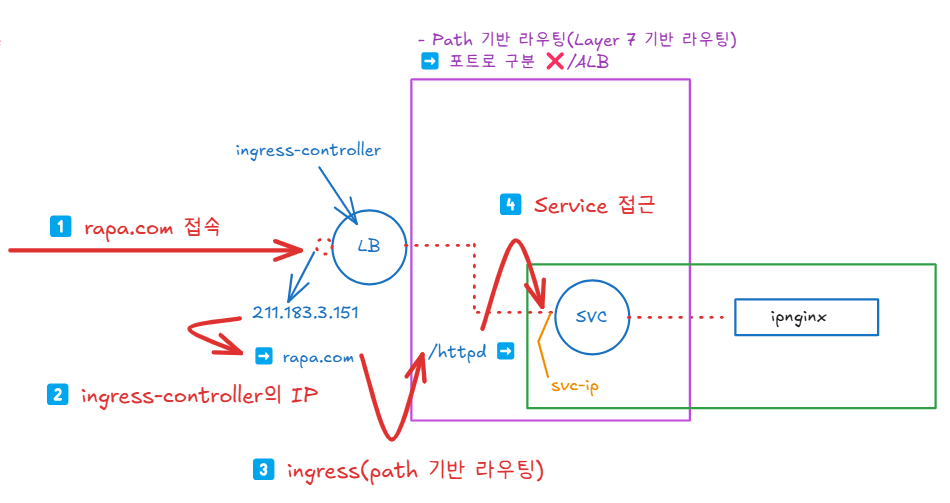
🌟 Ingress 전체 흐름
실습 - 02
문제
rapa.com/httpd 으로 접속했을 때, 61.254.18.30:5000/ipnginx 이 보이도록 이미 구성되어 있음.
rapa.com/ 으로 접속했을때61.254.18.30:5000/hnginx 이 보이도록 해보세요.
실습
1. headless 서비스 - manifest file 생성
root@master-250410:~/mani/ingress# cp ip.yml hip.yml
root@master-250410:~/mani/ingress# vi hip.yml

spec:
  replicas: 3
  selector:
    matchLabels:
      app: hnginx
  template:
    metadata:
      name: hip-pod
      labels:
        app: hnginx
    spec:
      containers:
      - name: hip-con
        image: 61.254.18.30:5000/ipnginx
2. headless 서비스 - manifest file 반영(apply)
root@master-250410:~/mani/ingress# kubectl apply -f hip.yml
service/svc-hip created
deployment.apps/hip-dep created
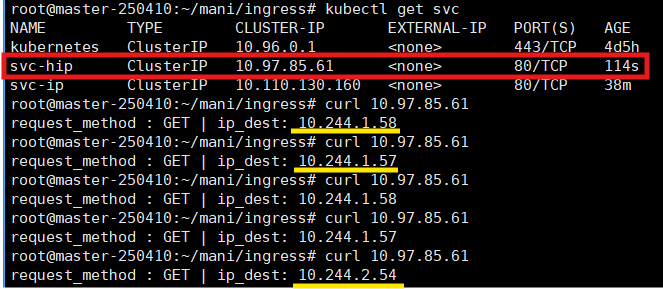
3. 서비스 정상 작동 확인
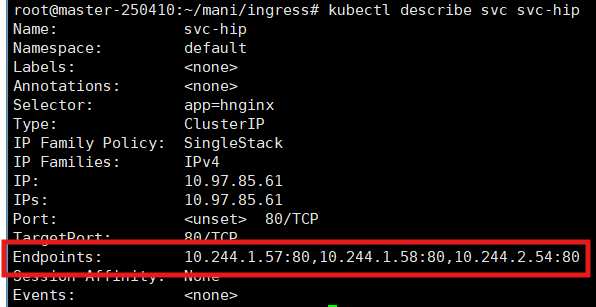
4. 서비스의 트래픽 분산 & Pod 정상 작동 확인
5. ingress의 manifest file 수정 - / 경로 라우팅 설정 추가
root@master-250410:~/mani/ingress# vi ingress.yml

    nginx.ingress.kubernetes.io/rewrite-target: /
spec:
  rules:
    - host: rapa.com
      http:
        paths:
          - path: /httpd
            pathType: Prefix
            backend:
              service:
                name: svc-ip #서비스의 이름
                port:
                  number: 80 #서비스의 포트
          - path: /
            pathType: Prefix
            backend:
              service:
                name: svc-hip
                port:
                  number: 80
6. ingress 수정 사항 반영(apply)
root@master-250410:~/mani/ingress# kubectl apply -f ingress.yml
ingress.networking.k8s.io/ingress configured
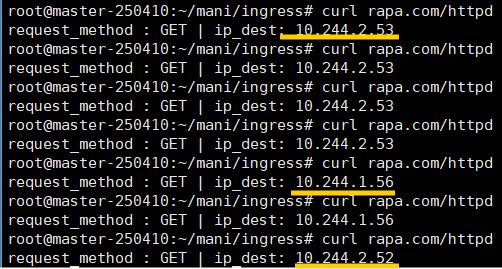
7. ingress 정상 작동 확인 - rapa.com/
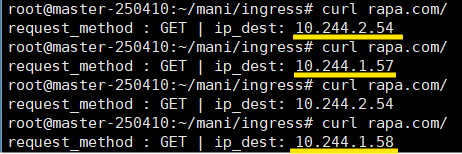
🌟 ingress - svc - pod로 이어지는 흐름이 잘 구성된 것을 확인 가능
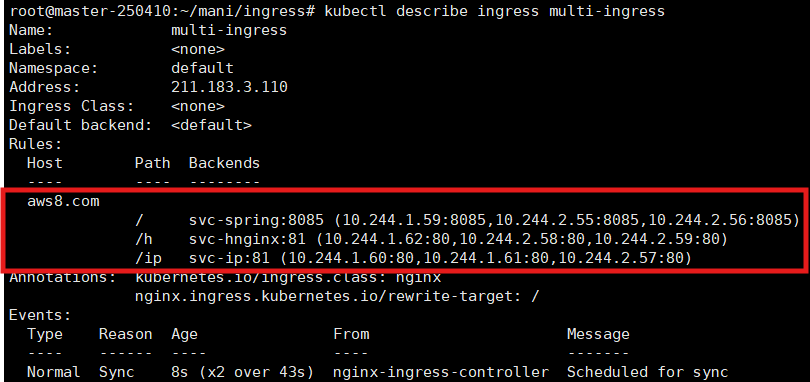
root@master-250410:~/mani/ingress# kubectl describe ingress ingress
root@master-250410:~/mani/ingress# kubectl describe ingress <ingress명>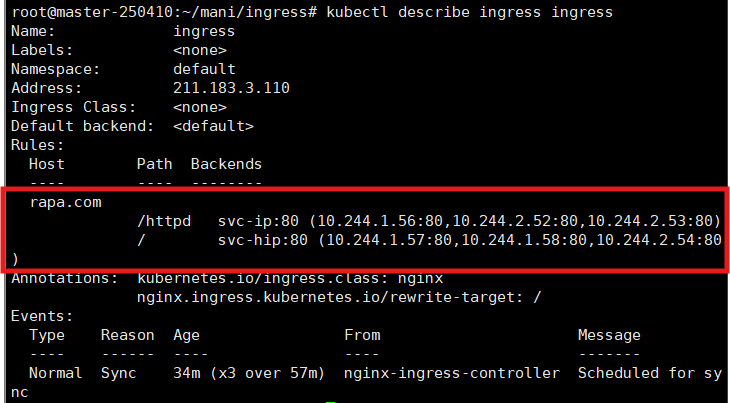
➕ 실습 - 02 정리
- 노트북은 rapa.com을 모르기 때문에 ➡️ rapa.com으로는 노트북에서 접속 ❌
👉 현재 rapa.com의 IP를 아는 것은 /etc/hosts에 등록해준 master 노드뿐 - ingress-controller의 svc는 ingress-nginx라는 네임스페이스에 존재하는데, 다른 리소스들은 default 네임스페이스에 존재
➡️ 어떻게 트래픽이 인가가 되는가?
👉 ingress-controller의 IP는 클러스터 외부에 존재하는 IP이기 때문에, ingress와 svc, pod들만 같은 네임스페이스에 존재하면 됨
실습 - 03
문제
mario라는 이름의 ingress를 생성하세요.
aws8.com/ 로 접속시 8085 포트로 동작하는 61.254.18.30:5000/pcm/spring:1 , 서비스포트는 8085
aws8.com/h로 접속 시 80 포트로 동작하는 61.254.18.30:5000/hnginx , 서비스포트는 81
aws8.com/ip로 접속 시 80 포트로 동작하는 61.254.18.30:5000/ipnginx , 서비스포트는 81
풀이
- 로드밸런서 타입의 경우, SVC의 포트를 따라가지만, ingress의 경우에는 그렇지 않음
- aws8.com/h로 접속하면 특정 서비스의 포트까지 명시하므로, 따로 포트를 명시할 필요❌
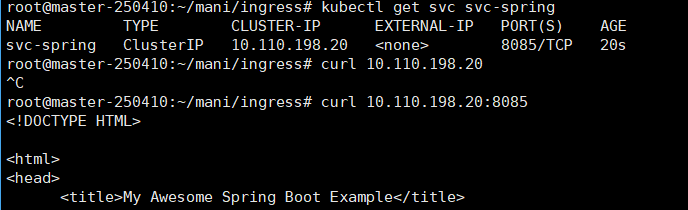
1. Spring
1-1. manifest file 생성
root@master-250410:~/mani/ingress# cp ip.yml spring.yml
root@master-250410:~/mani/ingress# vi spring.yml

apiVersion: v1
kind: Service
metadata:
  name: svc-spring
spec:
  selector:
    app: spring
  ports:
  - port: 8085
    targetPort: 8085
---
apiVersion: apps/v1
kind: Deployment
metadata:
  name: spring-dep
spec:
  replicas: 3
  selector:
    matchLabels:
      app: spring
  template:
    metadata:
      name: spring-pod
      labels:
        app: spring
    spec:
      containers:
      - name: spring-con
        image: 61.254.18.30:5000/pcm/spring:1
1-2. manifest file 반영(apply)
root@master-250410:~/mani/ingress# kubectl apply -f spring.yml
service/svc-spring created
deployment.apps/spring-dep created
1-3. pod & svc 작동 확인

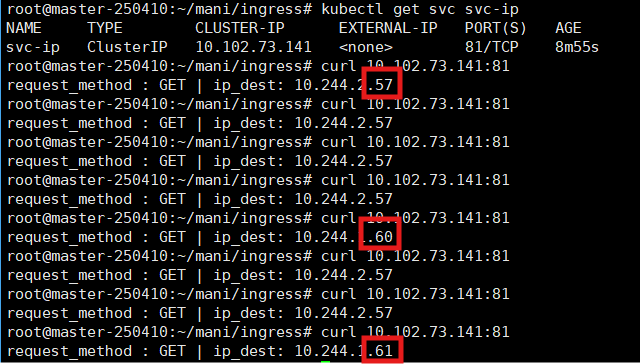
2. ipnginx
2-1. manifest file 생성
root@master-250410:~/mani/ingress# cp ip.yml ipnginx.yml
root@master-250410:~/mani/ingress# vi ipnginx.yml

apiVersion: v1
kind: Service
metadata:
  name: svc-ip
spec:
  selector:
    app: ipnginx
  ports:
  - port: 81
    targetPort: 80
---
apiVersion: apps/v1
kind: Deployment
metadata:
  name: ip-dep
spec:
  replicas: 3
  selector:
    matchLabels:
      app: ipnginx
  template:
    metadata:
      name: ip-pod
      labels:
        app: ipnginx
    spec:
      containers:
      - name: ip-con
        image: 61.254.18.30:5000/ipnginx
2-2. manifest file 반영(apply)
root@master-250410:~/mani/ingress# kubectl apply -f ipnginx.yml
service/svc-ip created
deployment.apps/ip-dep created
2-3. Pod, SVC 작동 확인

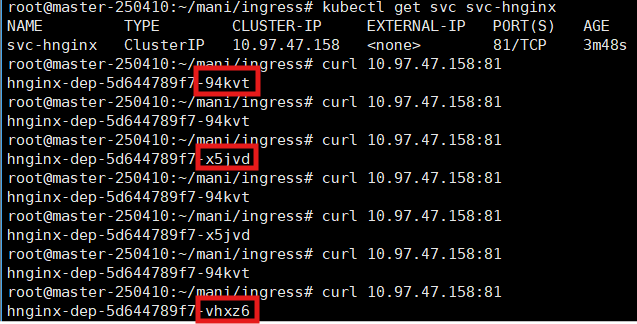
3. hnginx
3-1. manifest file 생성
root@master-250410:~/mani/ingress# cp ip.yml hnginx.yml
root@master-250410:~/mani/ingress# vi hnginx.yml

apiVersion: v1
kind: Service
metadata:
  name: svc-hnginx
spec:
  selector:
    app: hnginx
  ports:
  - port: 81
    targetPort: 80
---
apiVersion: apps/v1
kind: Deployment
metadata:
  name: hnginx-dep
spec:
  replicas: 3
  selector:
    matchLabels:
      app: hnginx
  template:
    metadata:
      name: hnginx-pod
      labels:
        app: hnginx
    spec:
      containers:
      - name: hnginx-con
        image: 61.254.18.30:5000/hnginx
3-2. manifest file 반영(apply)
root@master-250410:~/mani/ingress# kubectl apply -f hnginx.yml
service/svc-hnginx created
deployment.apps/hnginx-dep created
3-3. Pod, SVC 작동 확인

4. Ingress 설정
4-1. manifest file 생성
root@master-250410:~/mani/ingress# vi multi-ingress.yml

apiVersion: networking.k8s.io/v1
kind: Ingress
metadata:
  name: multi-ingress
  annotations:
    kubernetes.io/ingress.class: "nginx"
    nginx.ingress.kubernetes.io/rewrite-target: /
spec:
  rules:
    - host: aws8.com
      http:
        paths:
          - path: /
            pathType: Prefix
            backend:
              service:
                name: svc-spring #서비스의 이름
                port:
                  number: 8085 #서비스의 포트
          - path: /h
            pathType: Prefix
            backend:
              service:
                name: svc-hnginx
                port:
                  number: 81
          - path: /ip
            pathType: Prefix
            backend:
              service:
                name: svc-ip
                port:
                  number: 81
4-2. manifest file 반영(apply)

- 경고가 발생한 부분 수정
apiVersion: networking.k8s.io/v1
kind: Ingress
metadata:
  name: multi-ingress
  annotations:
    nginx.ingress.kubernetes.io/rewrite-target: /
spec:
ingressClassName: nginx- 경고가 사라진 것 확인 가능

4-3. Ingress 정상 작동 확인
5. 미니 DNS 설정
root@master-250410:~/mani/ingress# kubectl get svc -n ingress-nginx
NAME                                 TYPE           CLUSTER-IP       EXTERNAL-IP     PORT(S)                      AGE
ingress-nginx-controller             LoadBalancer   10.102.245.251   211.183.3.151   80:30223/TCP,443:32630/TCP   133m
ingress-nginx-controller-admission   ClusterIP      10.97.1.232      <none>          443/TCP                      133m


root@master-250410:~/mani/ingress# vi /etc/hosts

127.0.0.1 localhost
127.0.1.1 ubuntu-tem

# kubectl get svc -n ingress-nginx에서 나왔던 주소
# ingress-controller 주소
211.183.3.151 aws8.com
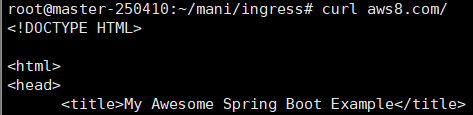
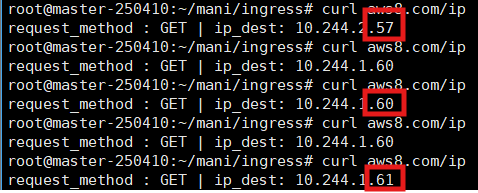
6. 결과 확인
6-1. spring
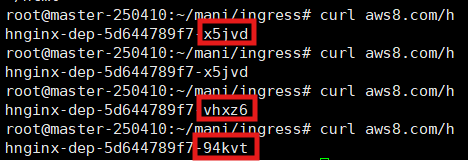
6-2. hnginx
6-3. ipnginx
'CS > Kubernetes' 카테고리의 다른 글
| [Kubernetes] 07. 자율과제 - Dynamic Provisioner (0) | 2025.04.17 |
|---|---|
| [Kubernetes] 06. RBAC, Dynamic Provisioner (0) | 2025.04.16 |
| [Kubernetes] 04. Resource - PV(Persistent Volume), StorageClass, ConfigMap, Secret (0) | 2025.04.15 |
| [Kubernetes] 02. Manifest File & ReplicaSet, Deployment, Namespace, Service, NodePort (0) | 2025.04.14 |
| [Kubernetes] 01. Kubernetes & Pod & Control Plane 주요 컴포넌트 (0) | 2025.04.10 |


